Category: Tutorials

Organizing Photos

As digital photographers, our photo collections can get out of hand. This page will discuss some ways of organizing your photos so you can back them up and find specific photos later on.
My iPhone, in particular, can have thousands of photos, screenshots, and videos. I have my iPhone photos automatically backup to my Google Drive. Plus iCloud Photos also keeps copies of these photos. These are a great backup for your photos, but if you want to free up space on your phone. You need to download them from iCloud so when you delete them from your phone. You will still have a copy.
From time to time, I tag my Google Drive photos and download them to my home computer. The hundreds of photos I tag are downloaded as a single zip file. When unzipped, they end up in a single directory and their names are non-descript.
So here are some of the ways to organize all these photos:
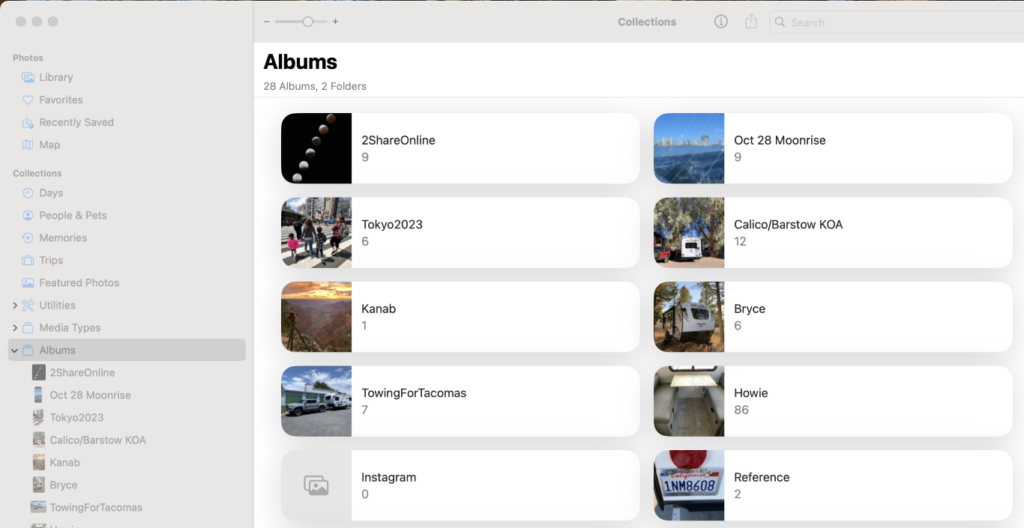
  • Apple Photos (free) – on MacOS & iOS, the Photos app can be used to organize your massive photo collection. Creating albums is the best way to organize large groups of photos. You can also setup Smart Albums, with criteria like “portraits” or “pets”, and Apple AI will auto-organize your photos.
    Apple laptops & iPhone are great at keeping all your photos safe. By backing all photos on your Mac, iPhone & iPad to iCloud automatically. This can be turned off or switched to Google Drive($). But unless you upgrade($) to more Apple storage, your large photo collection can max out the space. You can stop uploading to iCloud by setting your device to “not copy to the Photos library”. This will keep your photos from automatically going to iCloud.
    See next item if you want to move your Photos library from your main drive to an external drive.
  • Apple Photos (free) Part 2 – moving your Photos library to an external hard drive. Using Finder, under Favorites/Pictures find your Photos Library.photoslibrary file, then drag or copy it to your external drive. This can either become the primary location for your photos or act as a backup (second copy). I relabel the Photos Library.photoslibrary copy on the external drive something more descriptive, such as Photos2024 Library.photoslibrary. If you double-click this file or Option-Click the Photos app on the taskbar, you can select which .photoslibrary file you want to load. This will become your default Photos library until you select a different .photoslibrary or create a new one by option-clicking the Photos app.
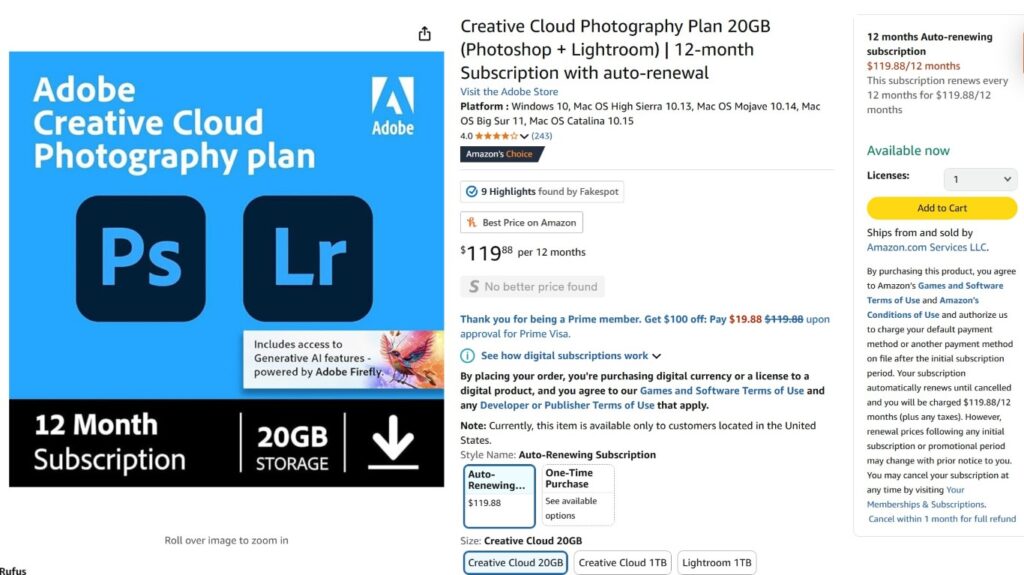
  • Adobe Lightroom Classic (Windows or Mac, $12/mo 0r $120/yr) – I use Lightroom Classic to import, organize, and process my digital images. I dislike subscribing to software but what Lightroom offers plus the continual updates of new features, makes the small monthly fee tolerable.
    When importing a memory card or photos folder, Lightroom has options for adding keywords, copying the photos/videos to a specific folder, sorting by date, and creating or adding to a collection, avoiding duplicates. It’s a great tool for a serious photographer although there is a learning curve.
    A Lightroom catalog (how Lightroom organizes your photos) can organize photos/videos located in different locations. Plus you can have multiple (even duplicate) catalogs to organize photos by subject or a single huge catalog that contains all your photos. Apple Photos does not give you this option, other than to load .photoslibrary files from different location.
  • Adobe Photoshop w/ Adobe Bridge (Windows or Mac, $12/mo 0r $120/yr) – Adobe sells Lightroom & Photoshop separately but the bundled price is pretty much the same price. Adobe Bridge offers similar photo-navigation features as Lightroom Classic. So if you prefer Photoshop over Lightroom (I use both interactively), Bridge is useful to organize and navigate your photo library.
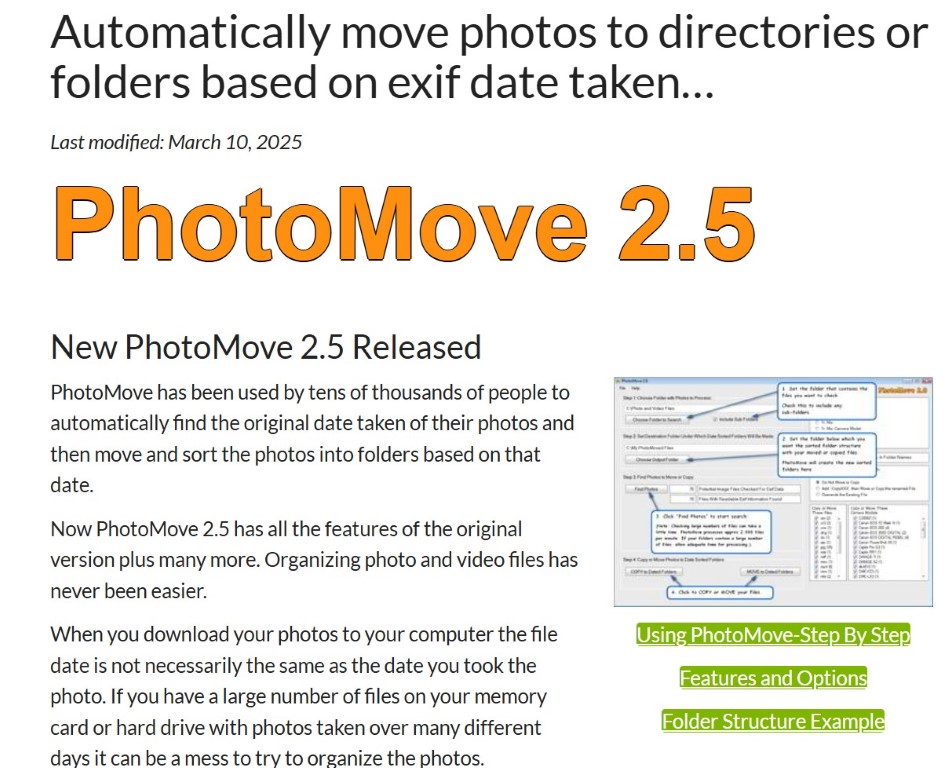
  • PhotoMove (Windows-only, free or $8 pro) – I use PhotoMove to organize all my iPhone photos and videos downloads. There are a couple Mac alternatives but they do not work as efficiently. So using PhotoMovePro ($8) on my Windows computer, I can organize all my iPhone photos into dated folders. Then I move these folders under the corresponding Lightroom folder then import them into Lightroom. Merging my iPhone photos with my mirrorless camera images. Since I often use a GoPro, iPhone, and mirrorless cameras when traveling. Photomove allows me to organize them into specific events. Lightroom could organize my iPhone downloads as well but having them pre-sorted before importing streamlines the process.
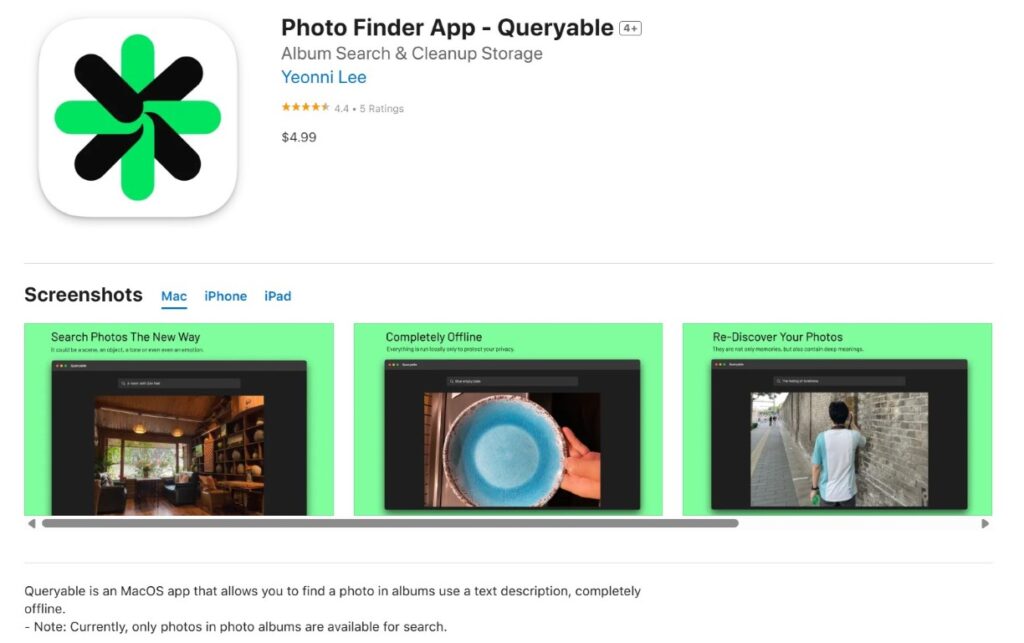
  • Photo Finder App – Queryable – ($5 MacOS, iPad & iPhone app) – this app does not organize your photos but is a great “fuzzy” search tool. Add a word or phrase to Queryable’s search field and it will display photos that match the word or phrase. It uses AI to search through all your photos and finds the matching photos. I’ve only used to a few times but it seems to do the job.

Tutorial: Processing Starry Images

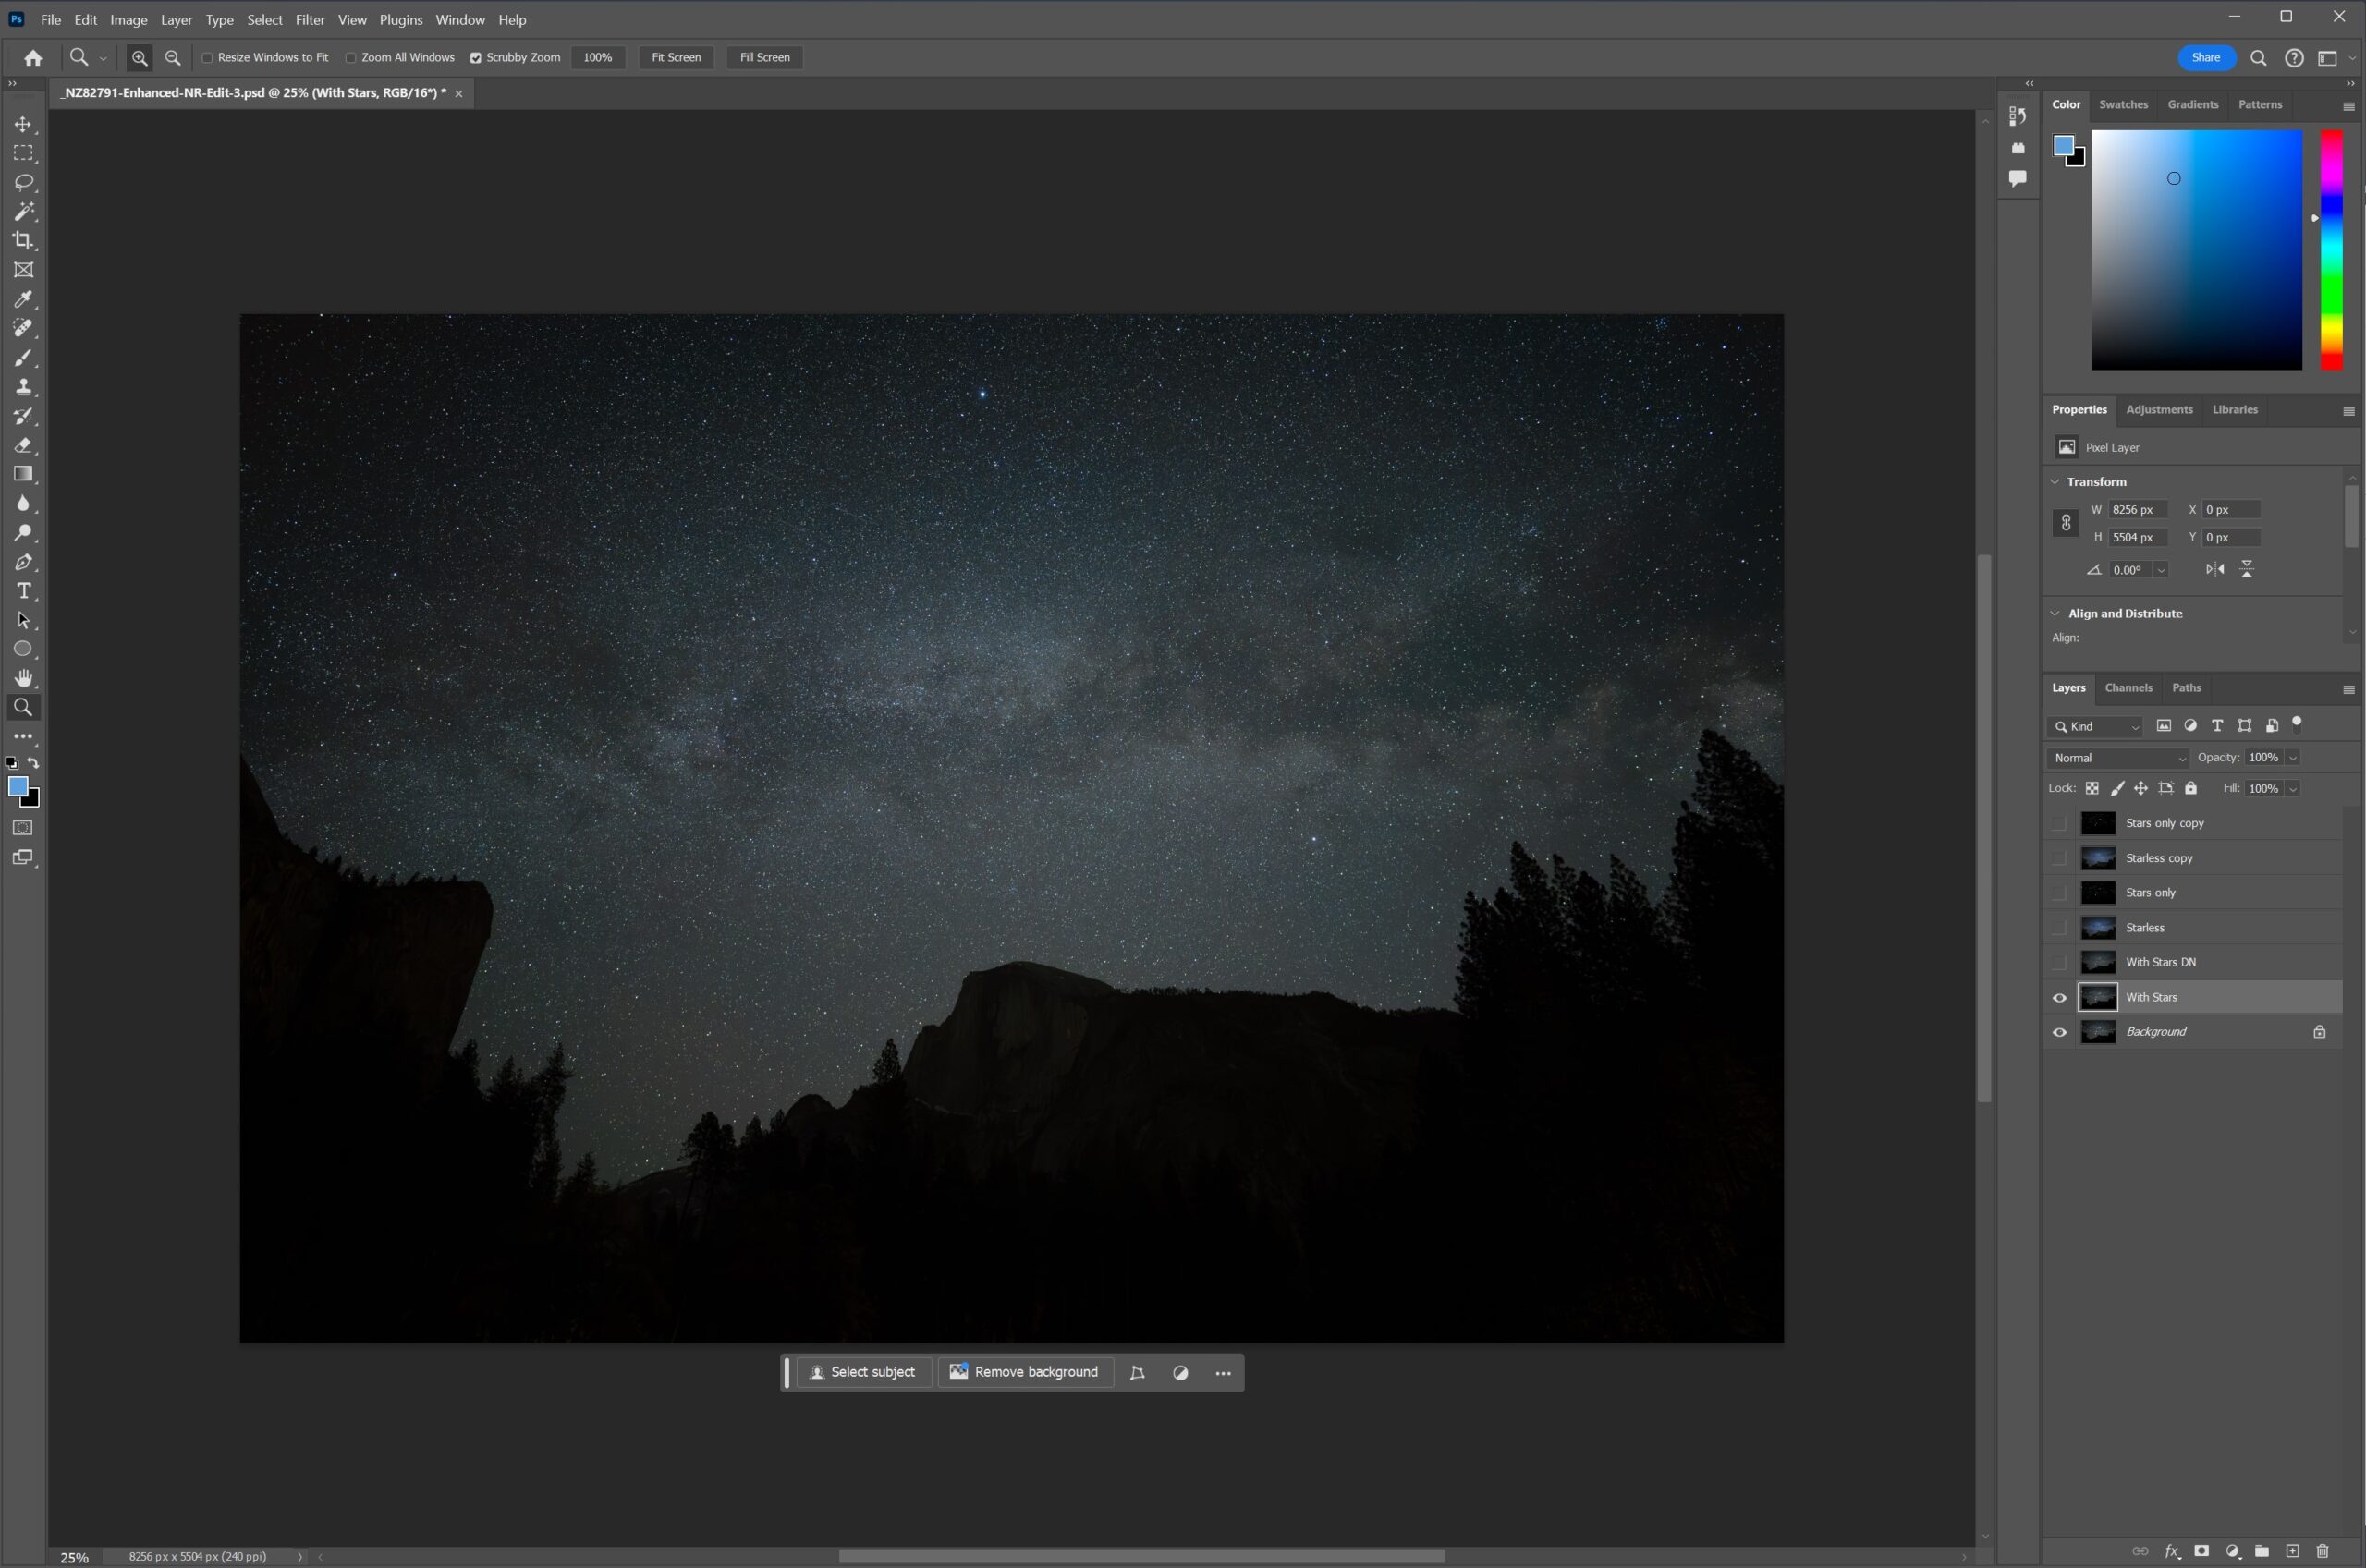
I recently learned of some tools that aide in the processing of astrophotography images. An Adobe Photoshop or PixInsight plugin called StarXterminator (by RC-Astro; $60 w/ 30day free trial) or the free command-line executable Starnet++. Either of these programs allow you to eliminate the stars from your photograph.
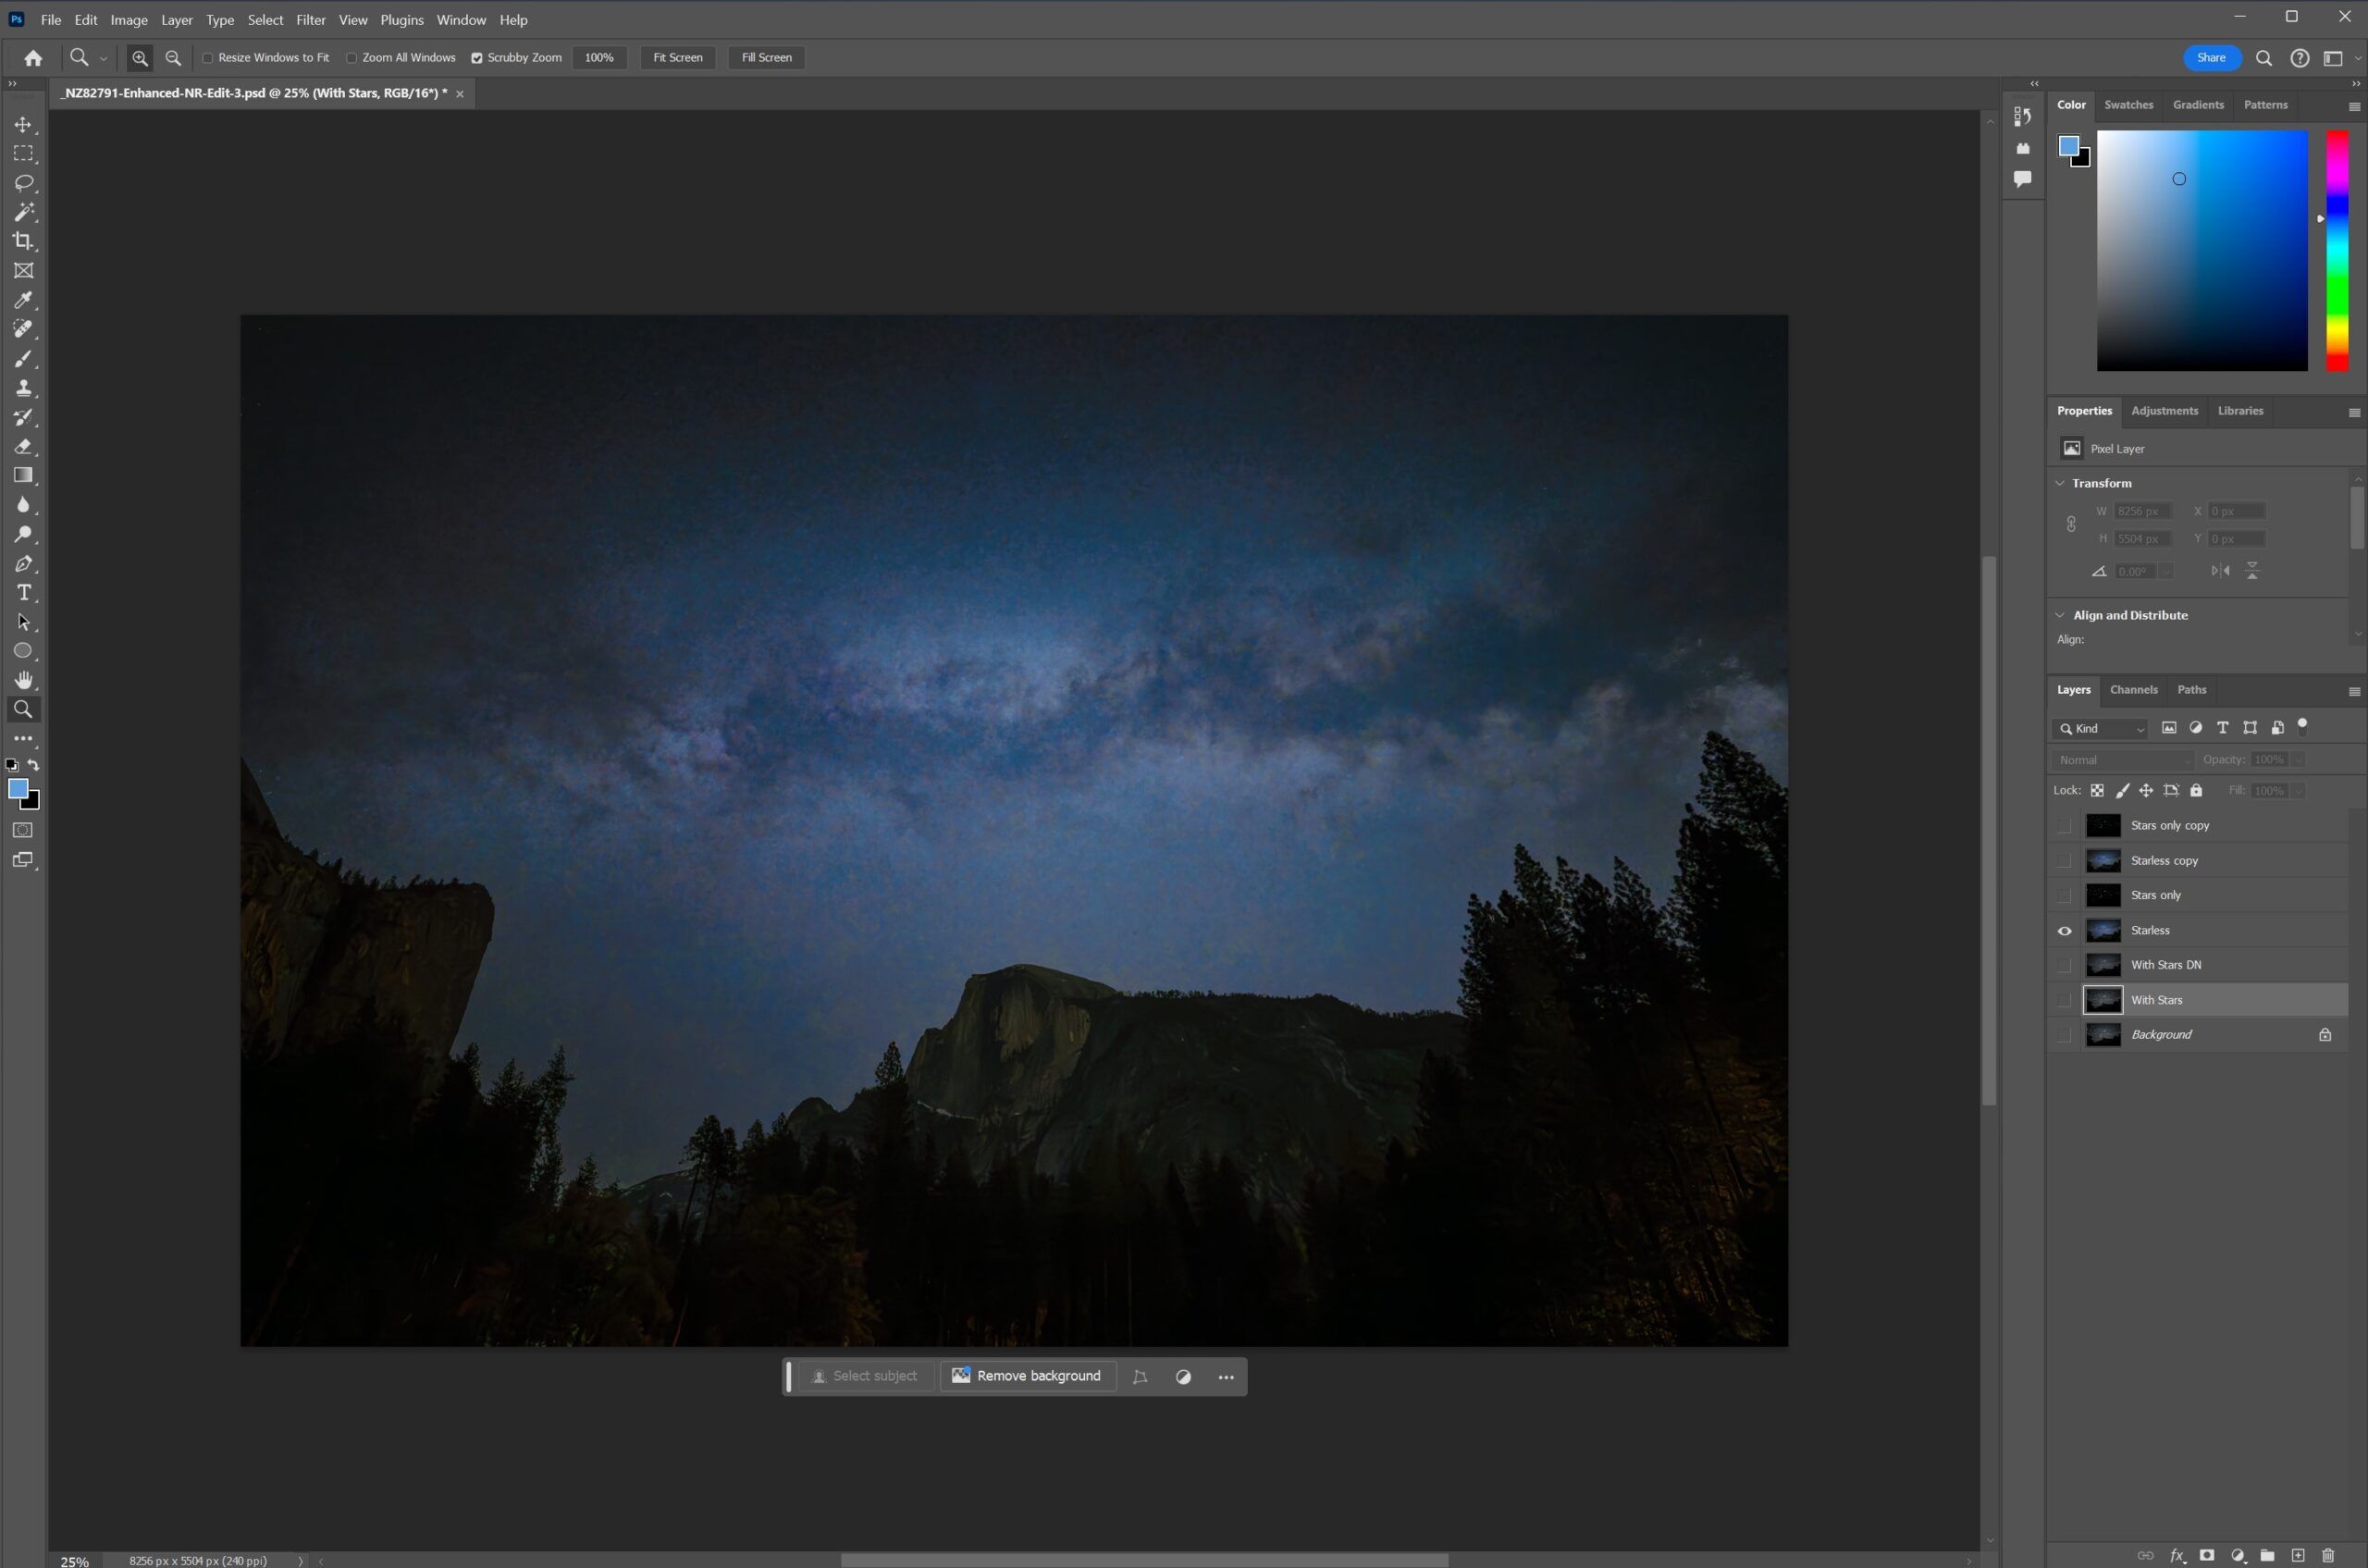
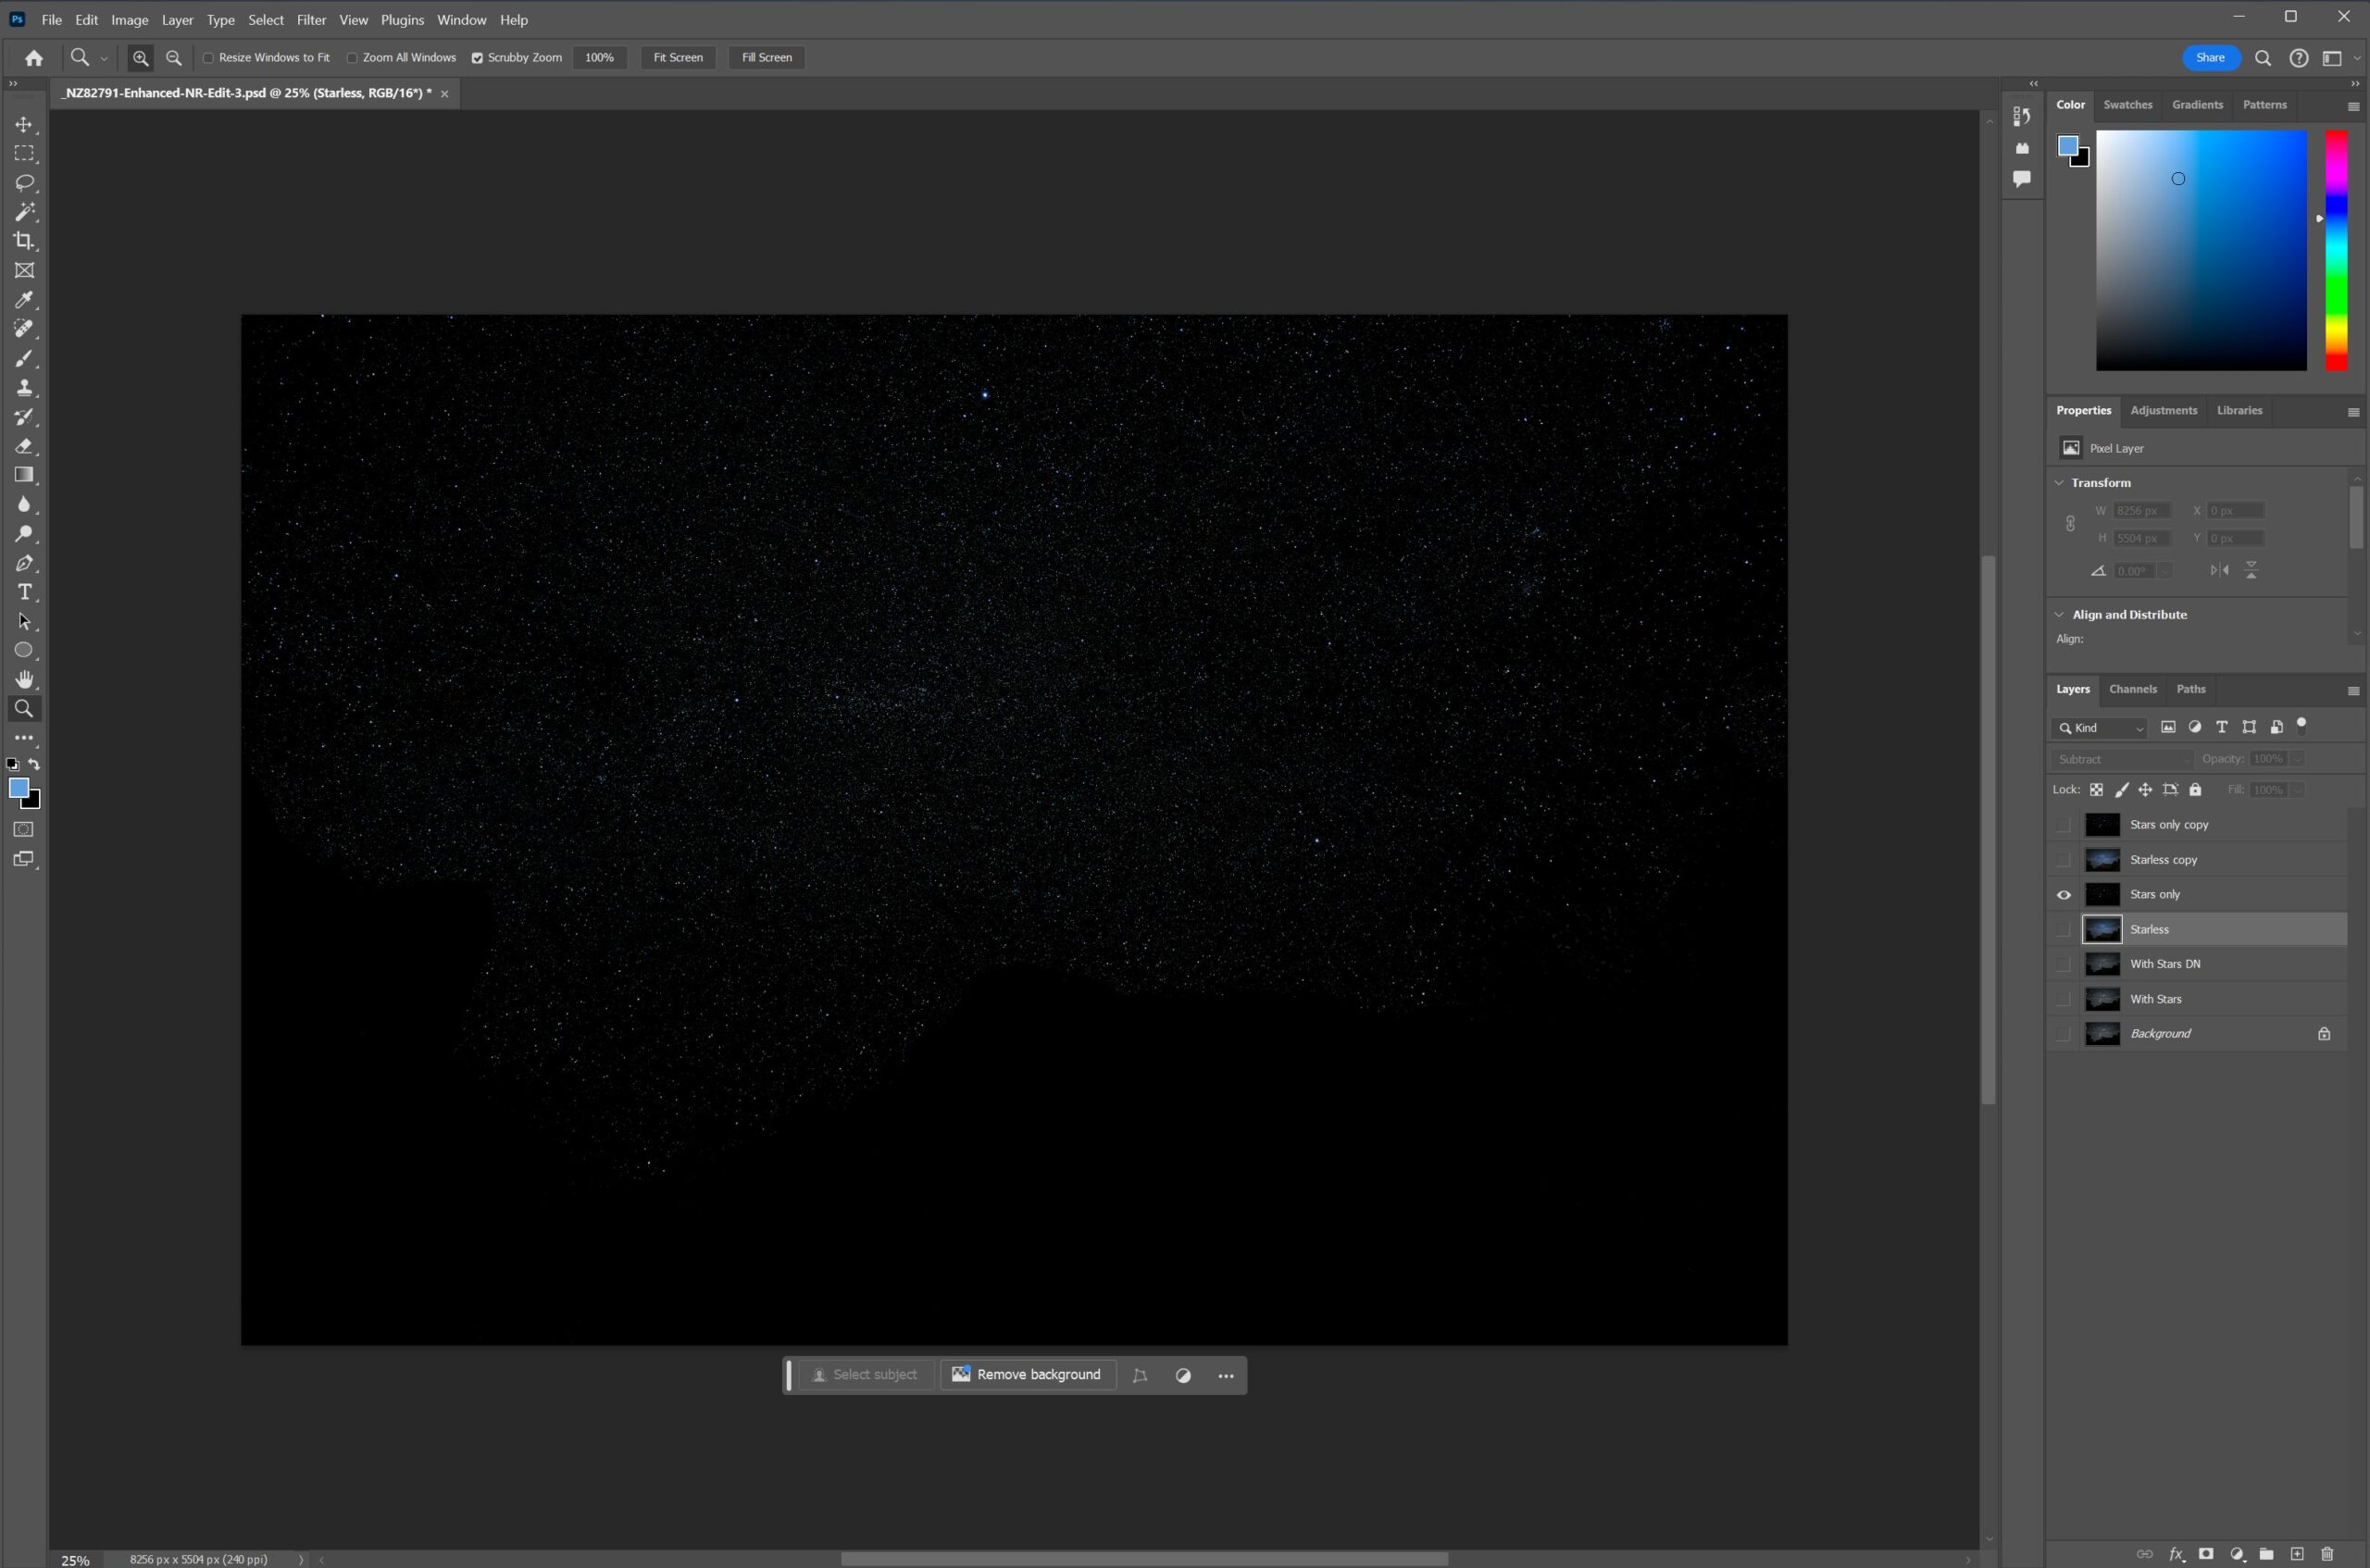
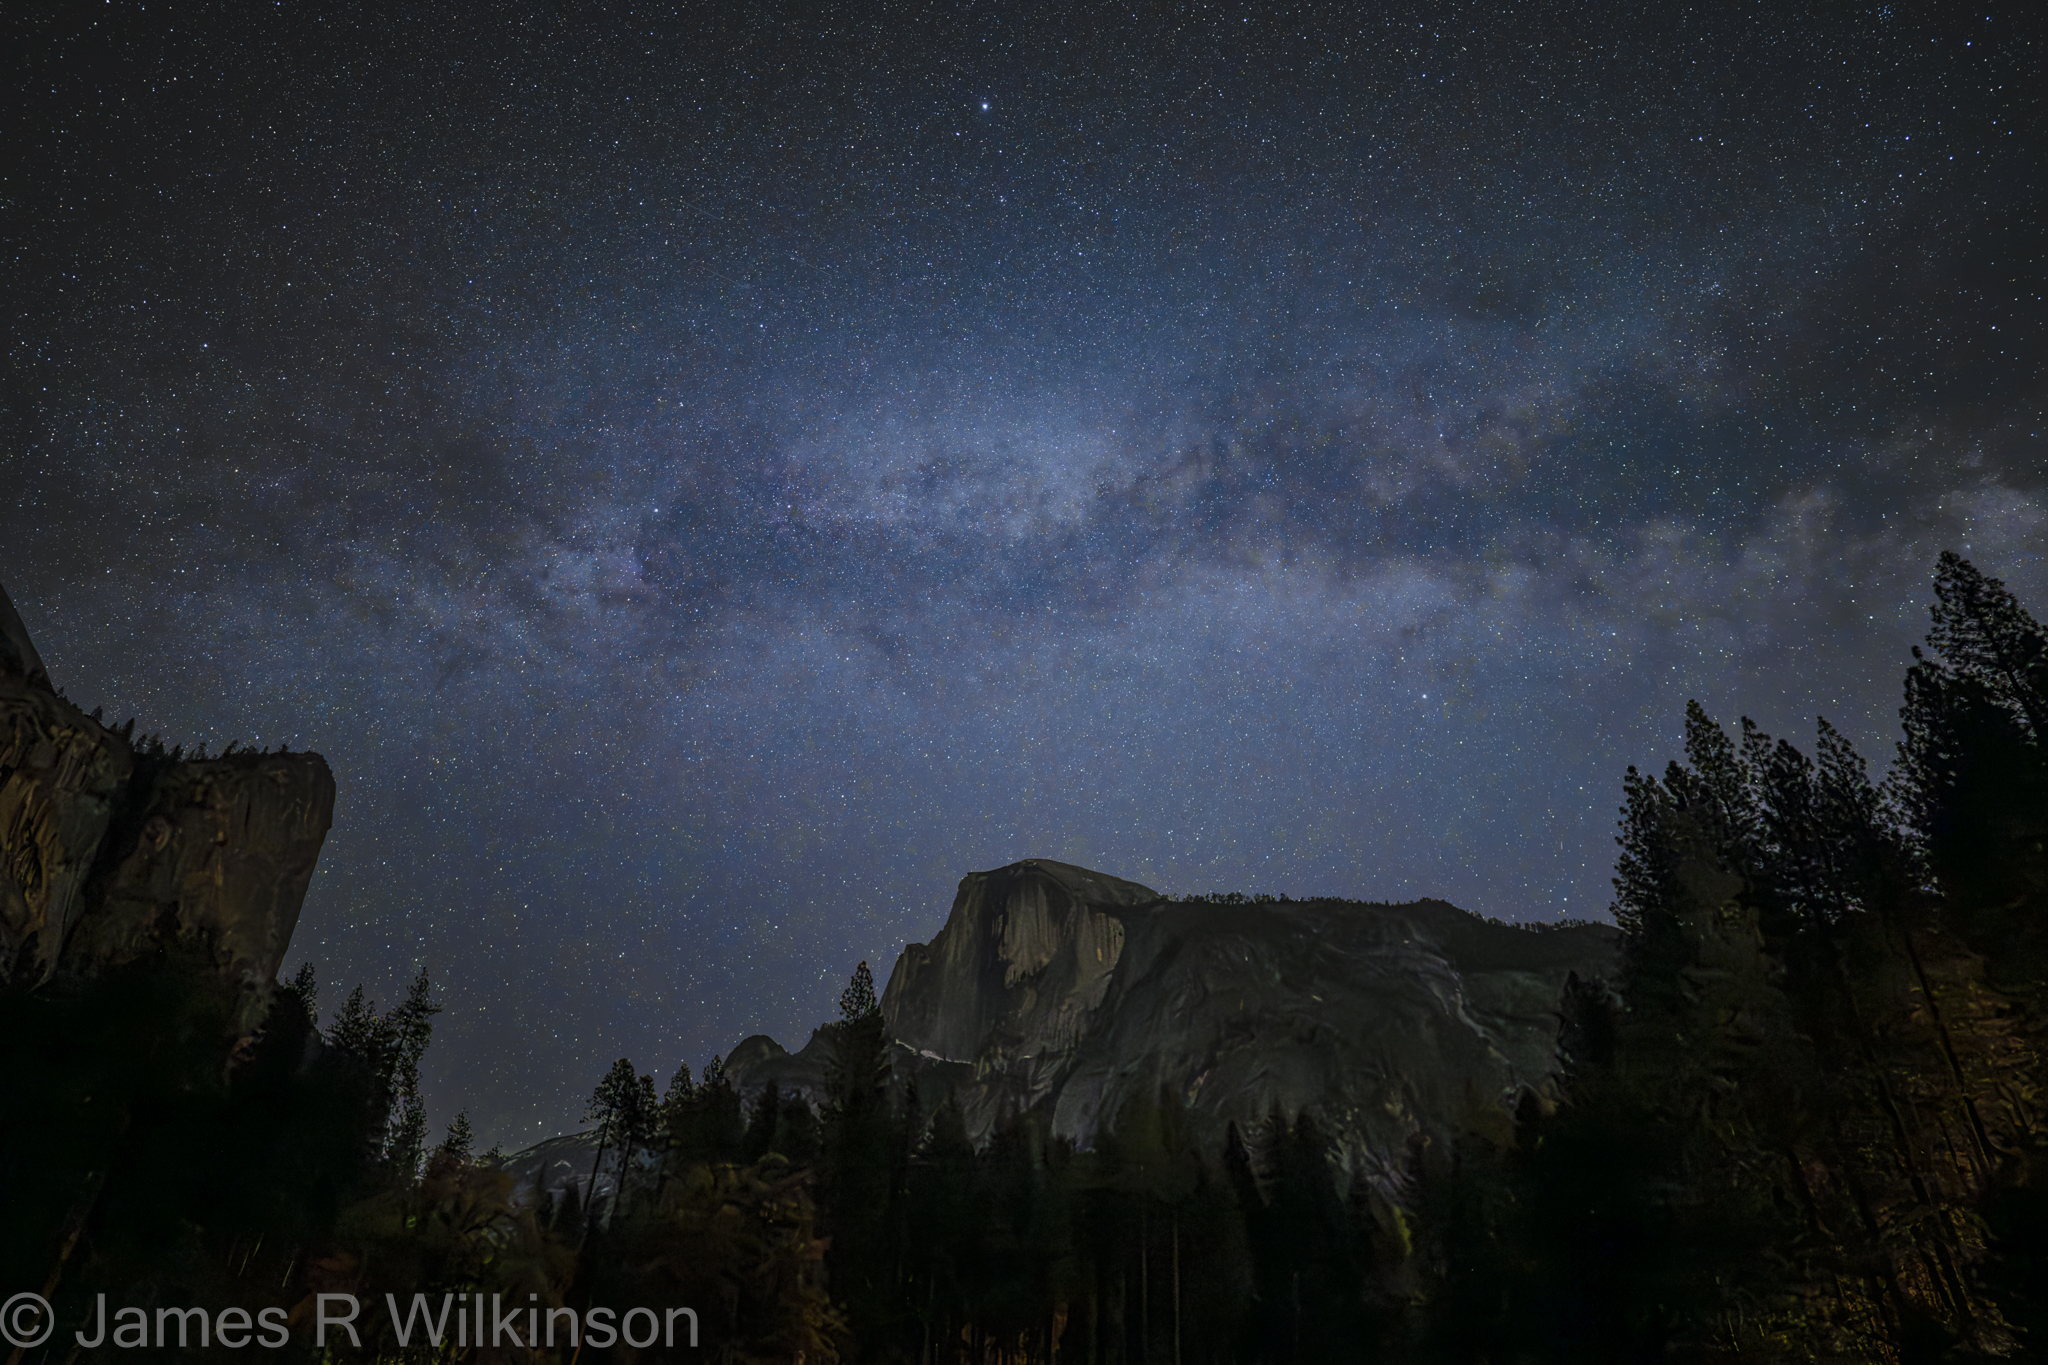
Why would that be useful? Because you end up with a starless Milky Way/Nebula layer and stars layer that you can process separately. This allows you to apply photo enhancements to the Milky Way (or Nebula) without affecting the stars and vice-versa. You can tone down the stars so they are less distracting to the Milky Way’s galactic core. You can also apply anti-coma or astigmatism corrections to the corner of your frame to improve star resolution.

Walk-through using StarXterminator plugin in Photoshop

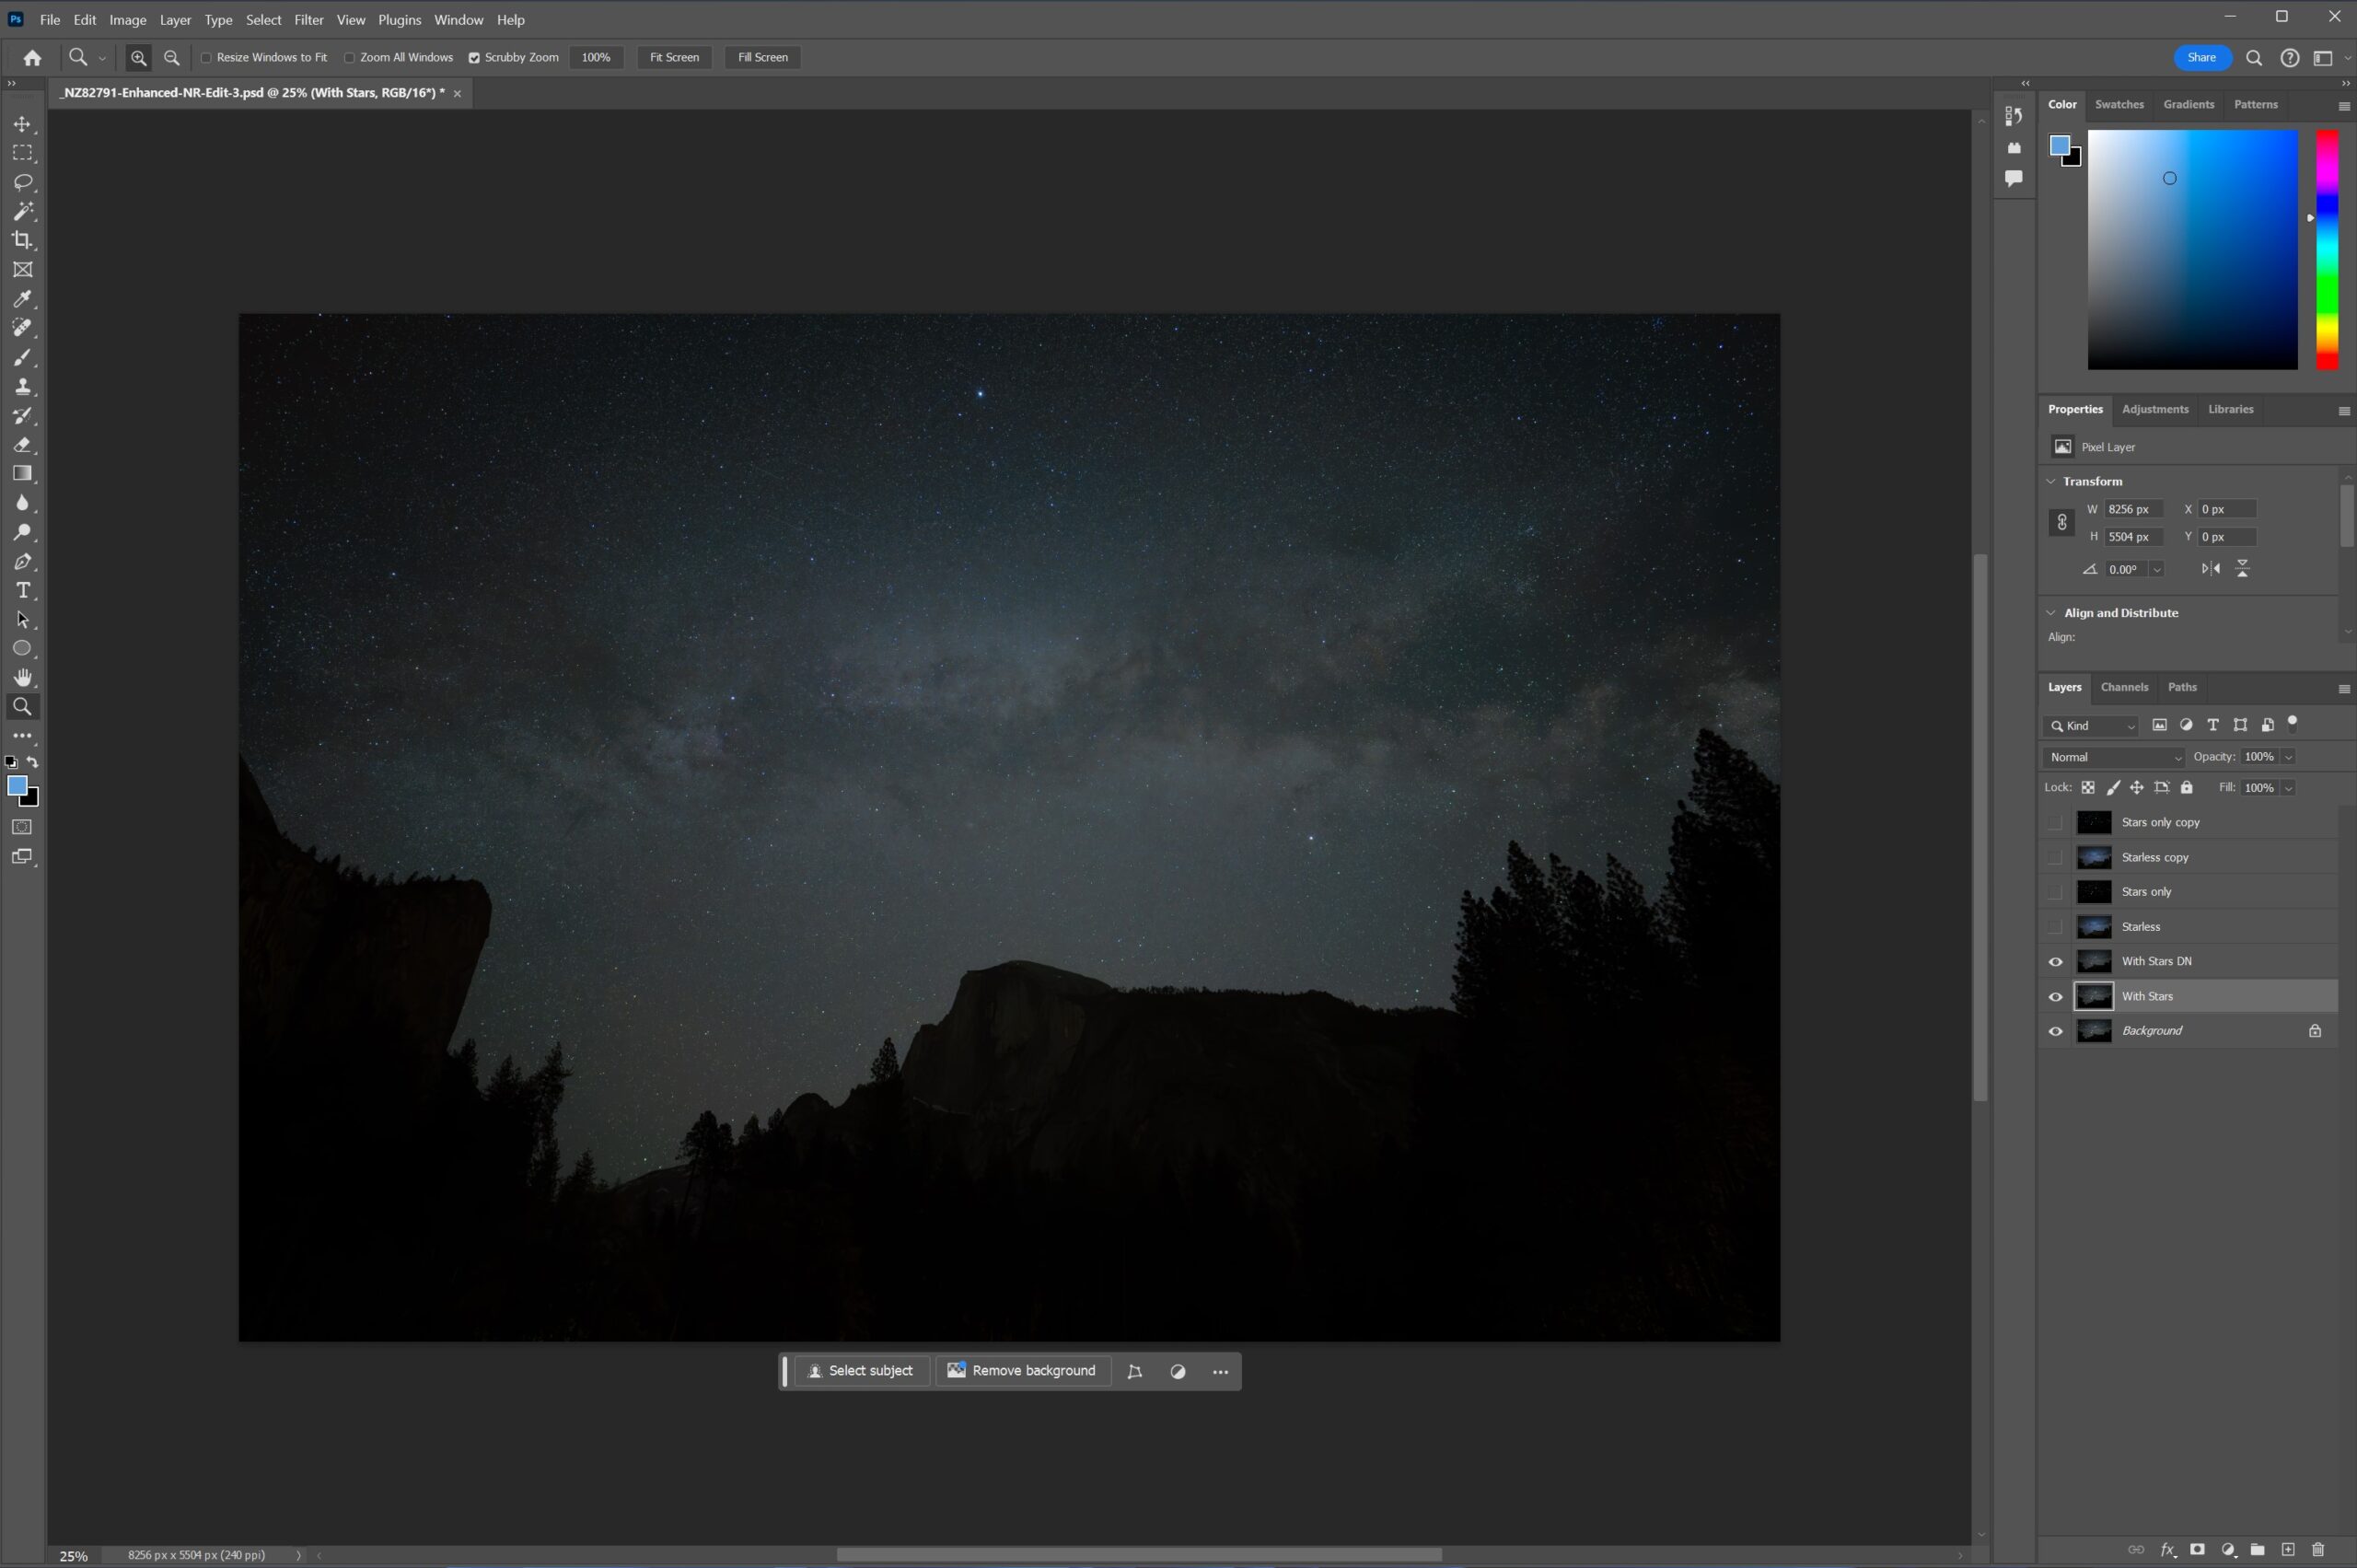
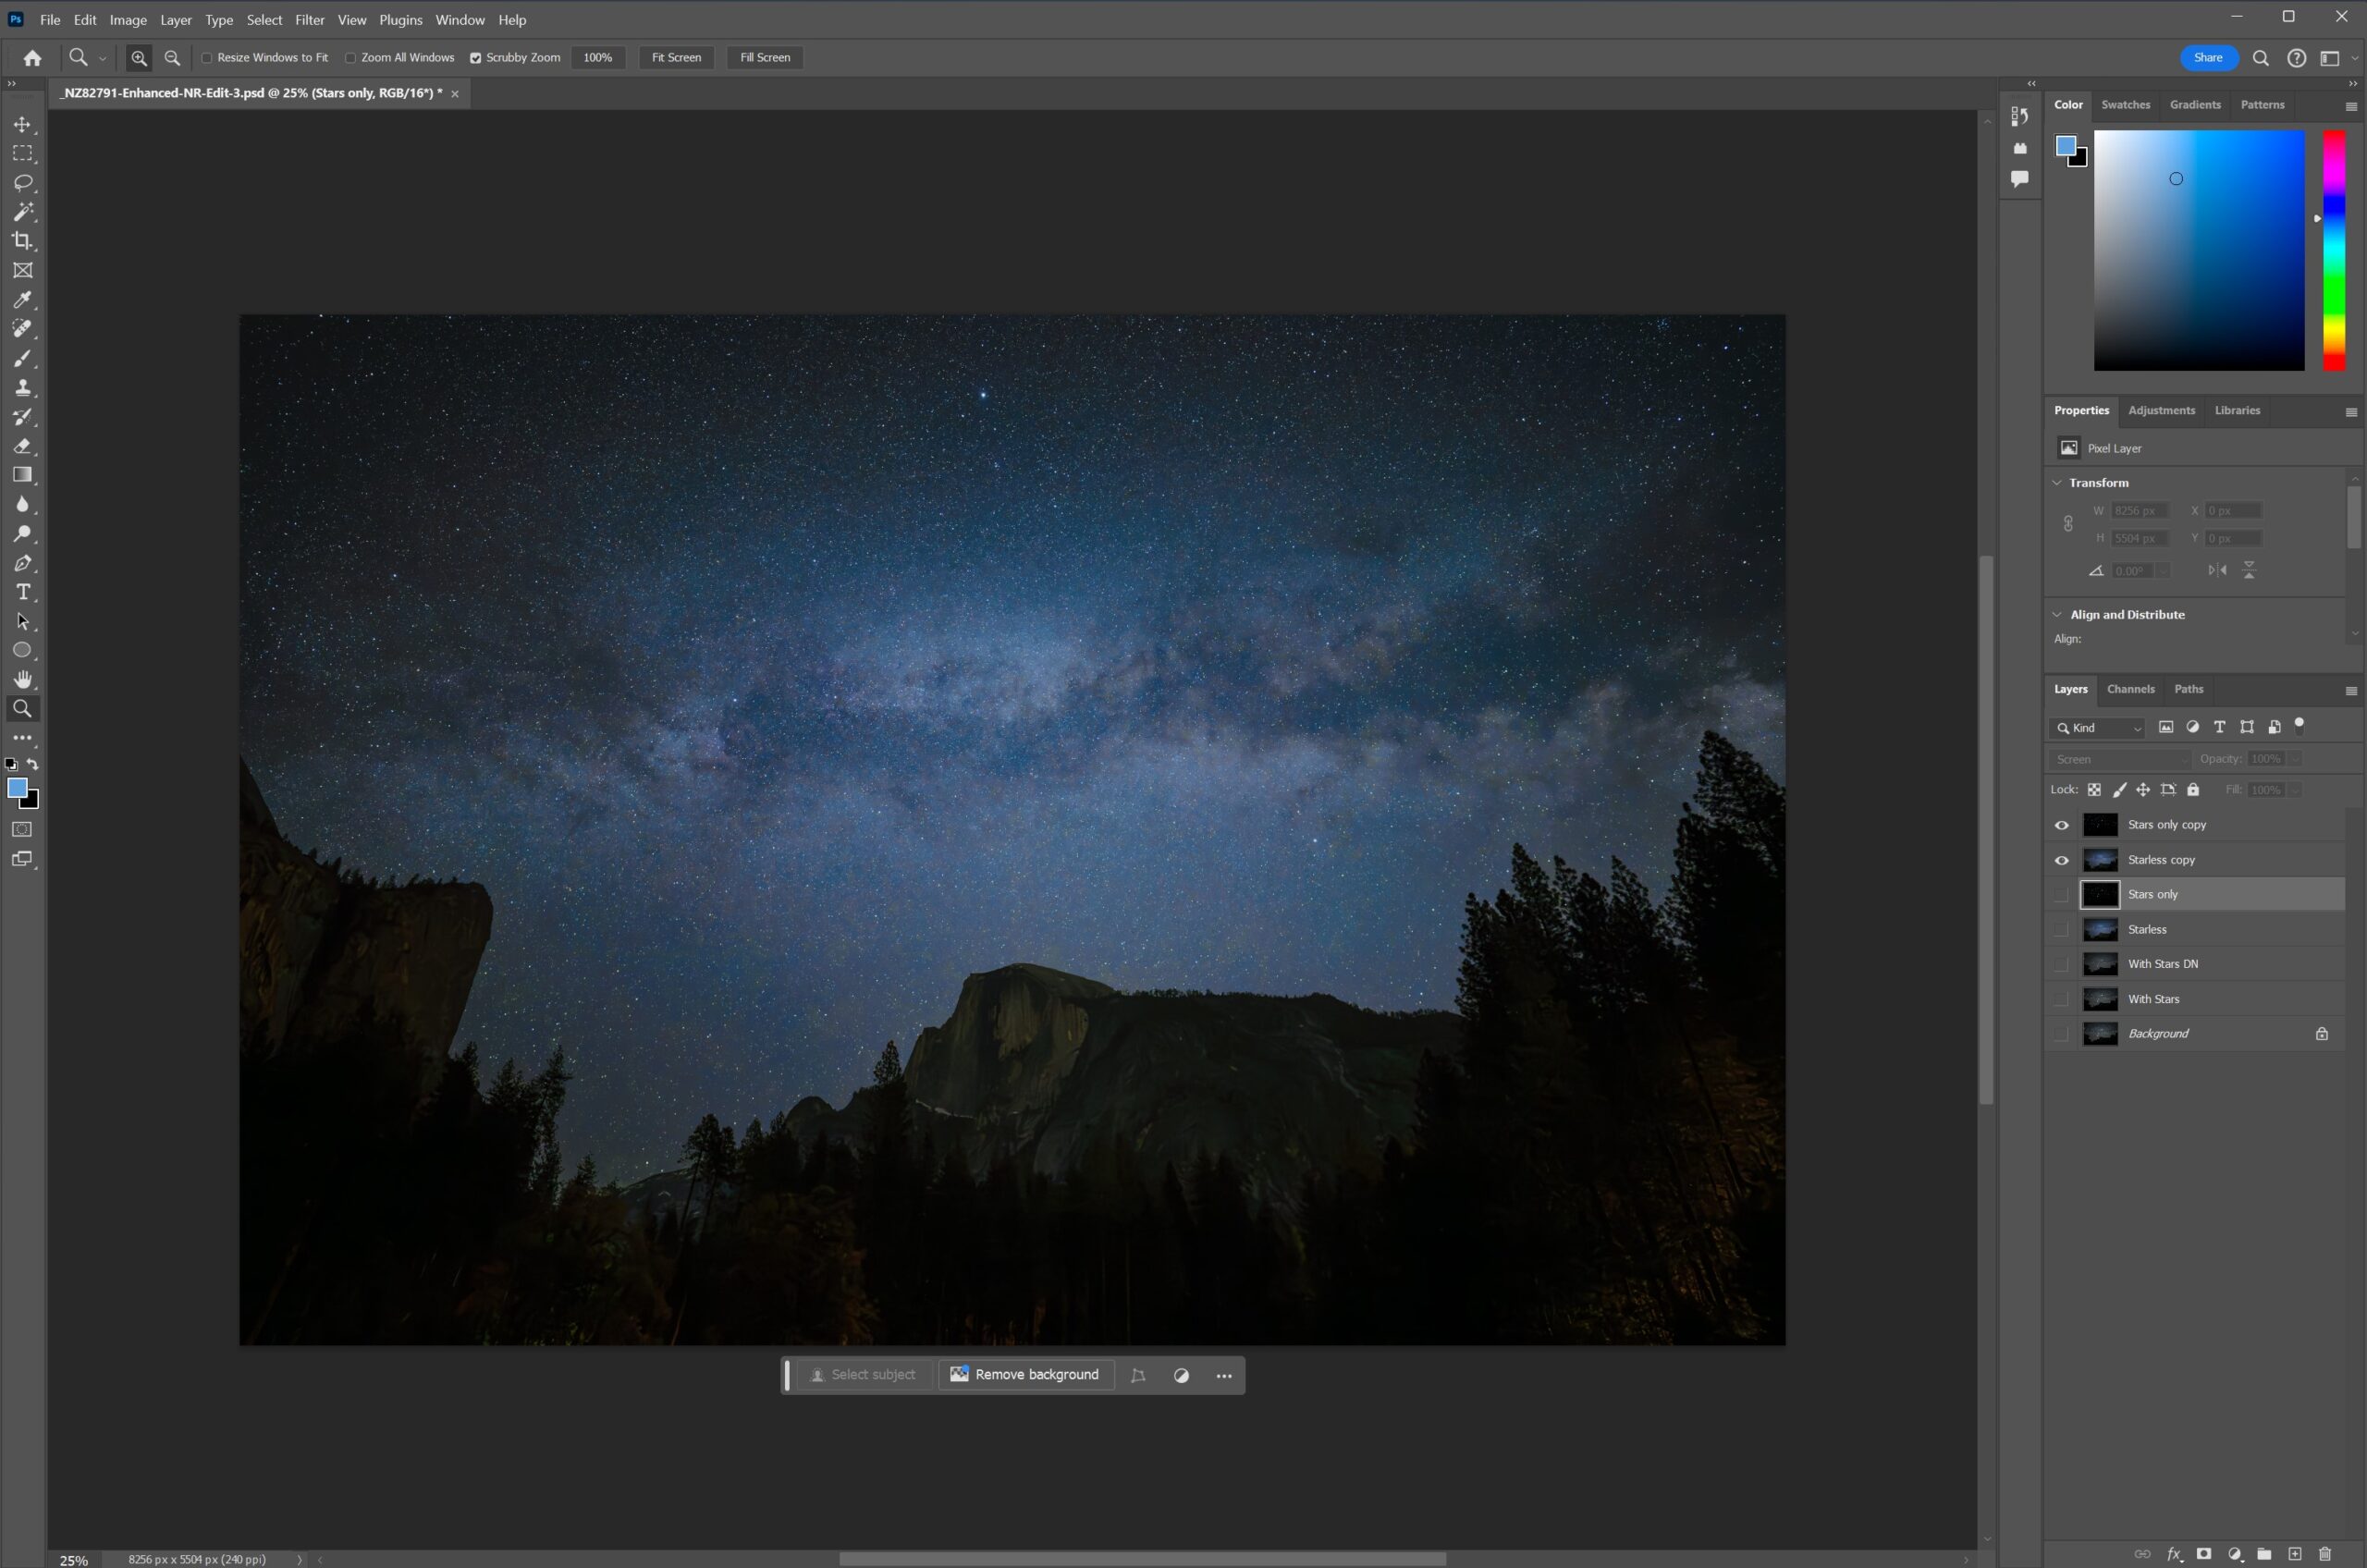
1). Open your Milky Way image in Photoshop then duplicate the layer. This will be the working copy of the original. Label it “With Stars”.

2). optional: Run the NoiseXterminator or Topaz DeNoise plugin if you want to remove noise. Or if you start in Lightroom, use its denoise tool before importing into Photoshop. You label this layer “With Star DN”.

3). Duplicate the ‘With Stars DN’ layer and label it “Starless”. Apply the Filter/StarXterminator plugin. You will end up with a Milky Way layer void of stars.
Note: Do this after you’ve downloaded and installed the Photoshop plugin. You will find it under Photoshop’s Filter menu, under ‘RC-Astro’ at the bottom. You can download a 30 day trial version of this and their other plugins.

4). Create a duplicate layer of both the ‘With Stars’ layer and ‘Starless’ layer. Be sure the ‘Starless copy’ layer is above the ‘With Stars copy’ layer. With the ‘Starless copy’ layer selected, select the ‘Subtract’ blend mode (box to the left of Opacity). Select both ‘Starless copy’ & ‘With Stars copy’ layers and merge. Relabel this layer as ‘Stars’.

5). Using Filter/Camera Raw Filter or other Photoshop tools, process both the Starless layer and Stars layers to your liking.

6). Once you are happy with the results, merge the layers.
If you want to be able to come back and reedit them. Duplicate both processed layers once more, select ‘screen’ as your overlay, then merge the two layer. Label this layer ‘Final Merged Image’ then export this layer as your final jpg.

Tutorial: Photoshop Sky Replacement AI

Adobe Photoshop can easily replace an empty sky with skies in Adobe’s library or your own. There are times when you’ve got a great photo but, because of timing or other circumstances, you miss a more interesting sky by minutes or hours or days.
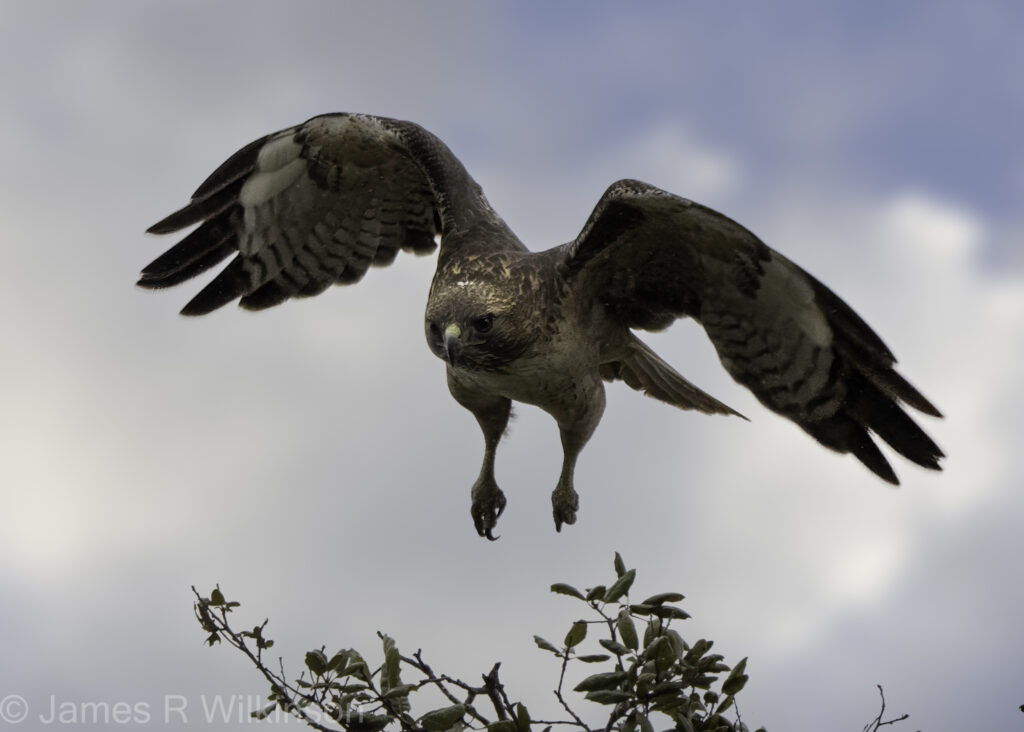
I photographed a Red Tail Hawk against grey rainy skies. Because of the bright backlighting, I added +2 stops compensation. So the bright, flat sky, was completely washed out. To add a more interesting sky, I used Photoshop’s Sky Replacement (Menu: /Edit/Sky Replacement) to replace the background. I also applied a Filter/Gaussian Blur to soften the focus on the crisp clouds, adding bokeh.
Purist will scoff at using tools as this but there are times and circumstances when this is fine in my photography. As long as I’m honest about what edits I’ve done and they aren’t presented as untouched. I grew up with photographic film artists like Jerry Uelsmann and Man Ray. Their photographic manipulations were part of their vision, creative process and integral to their photographic process.

If you prefer to use your own sky photos, once the sky replacement dialog box opens, click the v next to the sky thumbnail then the + in the lower right. A file select dialog box will open, select the photo – it can be a raw file – then click Open. This will add the sky to the existing library. Skies can be manipulated, scaled, flips, rotated, and edited. Although, you may want to do all your edits before importing the image into the library.

Adobe’s instructions on using your own skies:

Get the sky you love in three easy steps.” Adobe

Note – the following text if from Adobe’s sky replacement web page:

The Sky Replacement tool uses artificial intelligence to insert a new sky in place of the sky in the original image. Thanks to Sky Replacement algorithms, Photoshop can analyze and recognize the current sky and then plug in a new one. Upgrade your original sky in three steps:

1. Go to Select and choose Sky from the drop-down menu.

2. Choose Edit › Sky Replacement.

3. Use the sky drop-down to select a new sky from one of the preset sky images.


Adobe Photoshop offers a collection of skies, organized in three categories: Blue Skies, Spectacular, and Sunset. Blue Skies include daytime skies in solid blue or with clouds. Spectacular skies range from dramatic storm clouds and sunscapes to rainbows and a night sky. Sunset features yellow, orange, pink, and red sunset hues.

You can also import and use your own sky image to replace the sky. To do this, click the down caret and then the plus sign — you can import any JPG or PNG image.

“The best thing about Sky Replacement is that everything remains editable via the traditional Photoshop workflow,” says photoshop expert Jesús Ramirez. “This is not like a filter where once you apply it, you’re stuck with it. You actually have a lot of control, and all these controls eventually become a layer mask or adjustment layer.”

https://www.adobe.com/creativecloud/photography/discover/sky-replacement.html#:~:text=Get%20the%20sky,or%20adjustment%20layer.%E2%80%9D

Tutorial: Nik Collections (Google Version)

Disclaimer – Nik Collections is a product currently sold by DXO for $149. But versions have been around for a long time, originally developed in 1995 by Nik Multimedia & sold for $600/copy. Google acquired it in 2012, sold it for $150/copy, then distributed it for free in 2016. DXO bought it in 2017 and currently updates and improves it.
The free google version (courtesy of Techspot: Windows or Mac) is what I’ve been using successfully with the latest version (v13.1, Jan 2024) of Lightroom Classic. Some websites suggest there are bugs using the 2016 version with the latest Adobe products. So far, I’ve had good luck and results but your mileage may vary. I’ve only used the Silver Efex Pro 2 module, not the sharpener, analog, or other modules. For more information, google “Nik Collection free version”.

Black & White Presets

I’ve been interested in film simulations both color and b&w. But I have been somewhat disappointed in many I’ve tried, especially b&w. I like the idea of making my images less digital looking, adding film-like qualities. Many digital photographers have been resorting to mist or glimmer filters to take the ‘digital-edge’ off. These soften the highlights without affecting the shadows. So trying these filters and tinkering with the digital camera color science has been something I’m exploring.
When converting color images to black&white, I haven’t like the results when applying a film simulation. I loved Plus-X and Tri-X film, back-in-the-day. But the artificial grain added by their film simulation presets don’t work for me. So I’ve been trying Silver Efex Pro 2, part of Nik Collection, to convert my color images to black & white. As with any digital darkroom tool, Silver Efex Pro 2 gives me a base b&w image to work on. Nik Collection are a group of plugins for Lightroom and Photoshop. So the color image is exported by Lightroom (with or without Lightroom edits) into a Nik Collection toolbox. I prefer the Silver Efex Pro 2 modules. You cycle through the different presets then save back into Lightroom for further edits and final output. Some of Silver Efex’s presets are extreme but I often get a better result than Lightroom’s b&w presets. I’m sure I could end up with similar results using Lightroom but found Silver Efex to be a better starting point.

Example from Reflections/Komorebi (click each image & read the filename for the Silver Efex Preset used)

Tutorial: Creating an Adobe Portfolio

If you subscribe to Adobe Creative Cloud, you can create a free online portfolio. It’s not really free since it requires a subscription but it is a nice addition to their software suite.

There are plenty of YouTube tutorials on how to setup an Adobe portfolio website:

https://www.youtube.com/results?search_query=adobe+portfolio+for+photographers

Or you can follow the instructions below to get started, it’s easy if you’ve created web content before:

  1. Sign into portfolio.adobe.com using your Adobe login credentials
  2. Select Full Portfolio or Welcome; they’re basically the same but with
    Welcome, you start by creating a personalized cover page then adding portfolio pages.
    Full Portfolio builds a home page with a cover image for every gallery page-album. You can create a cover page later if you decide you prefer a simpler home page. Since it really doesn’t matter, I selected Full Portfolio
    • Full Portfolio has 12 themes to choose from so select your favorite. You can always change your theme later. Example site: fotoikigai.myportfolio.com (note that I have assign a custom domain jrwilkinson.com to this portfolio site).
    • Welcome has 6 themes so if you start by creating a Welcome page, select the theme. You can always change your theme later. Example site: jrwilkinson.myportfolio.com
  3. With either Full Portfolio or Welcome selected, pick a theme. You can scroll through the different themes to get an idea of their look. Once you find one that looks promising, click on Use This Theme in the upper right to create your portfolio website.
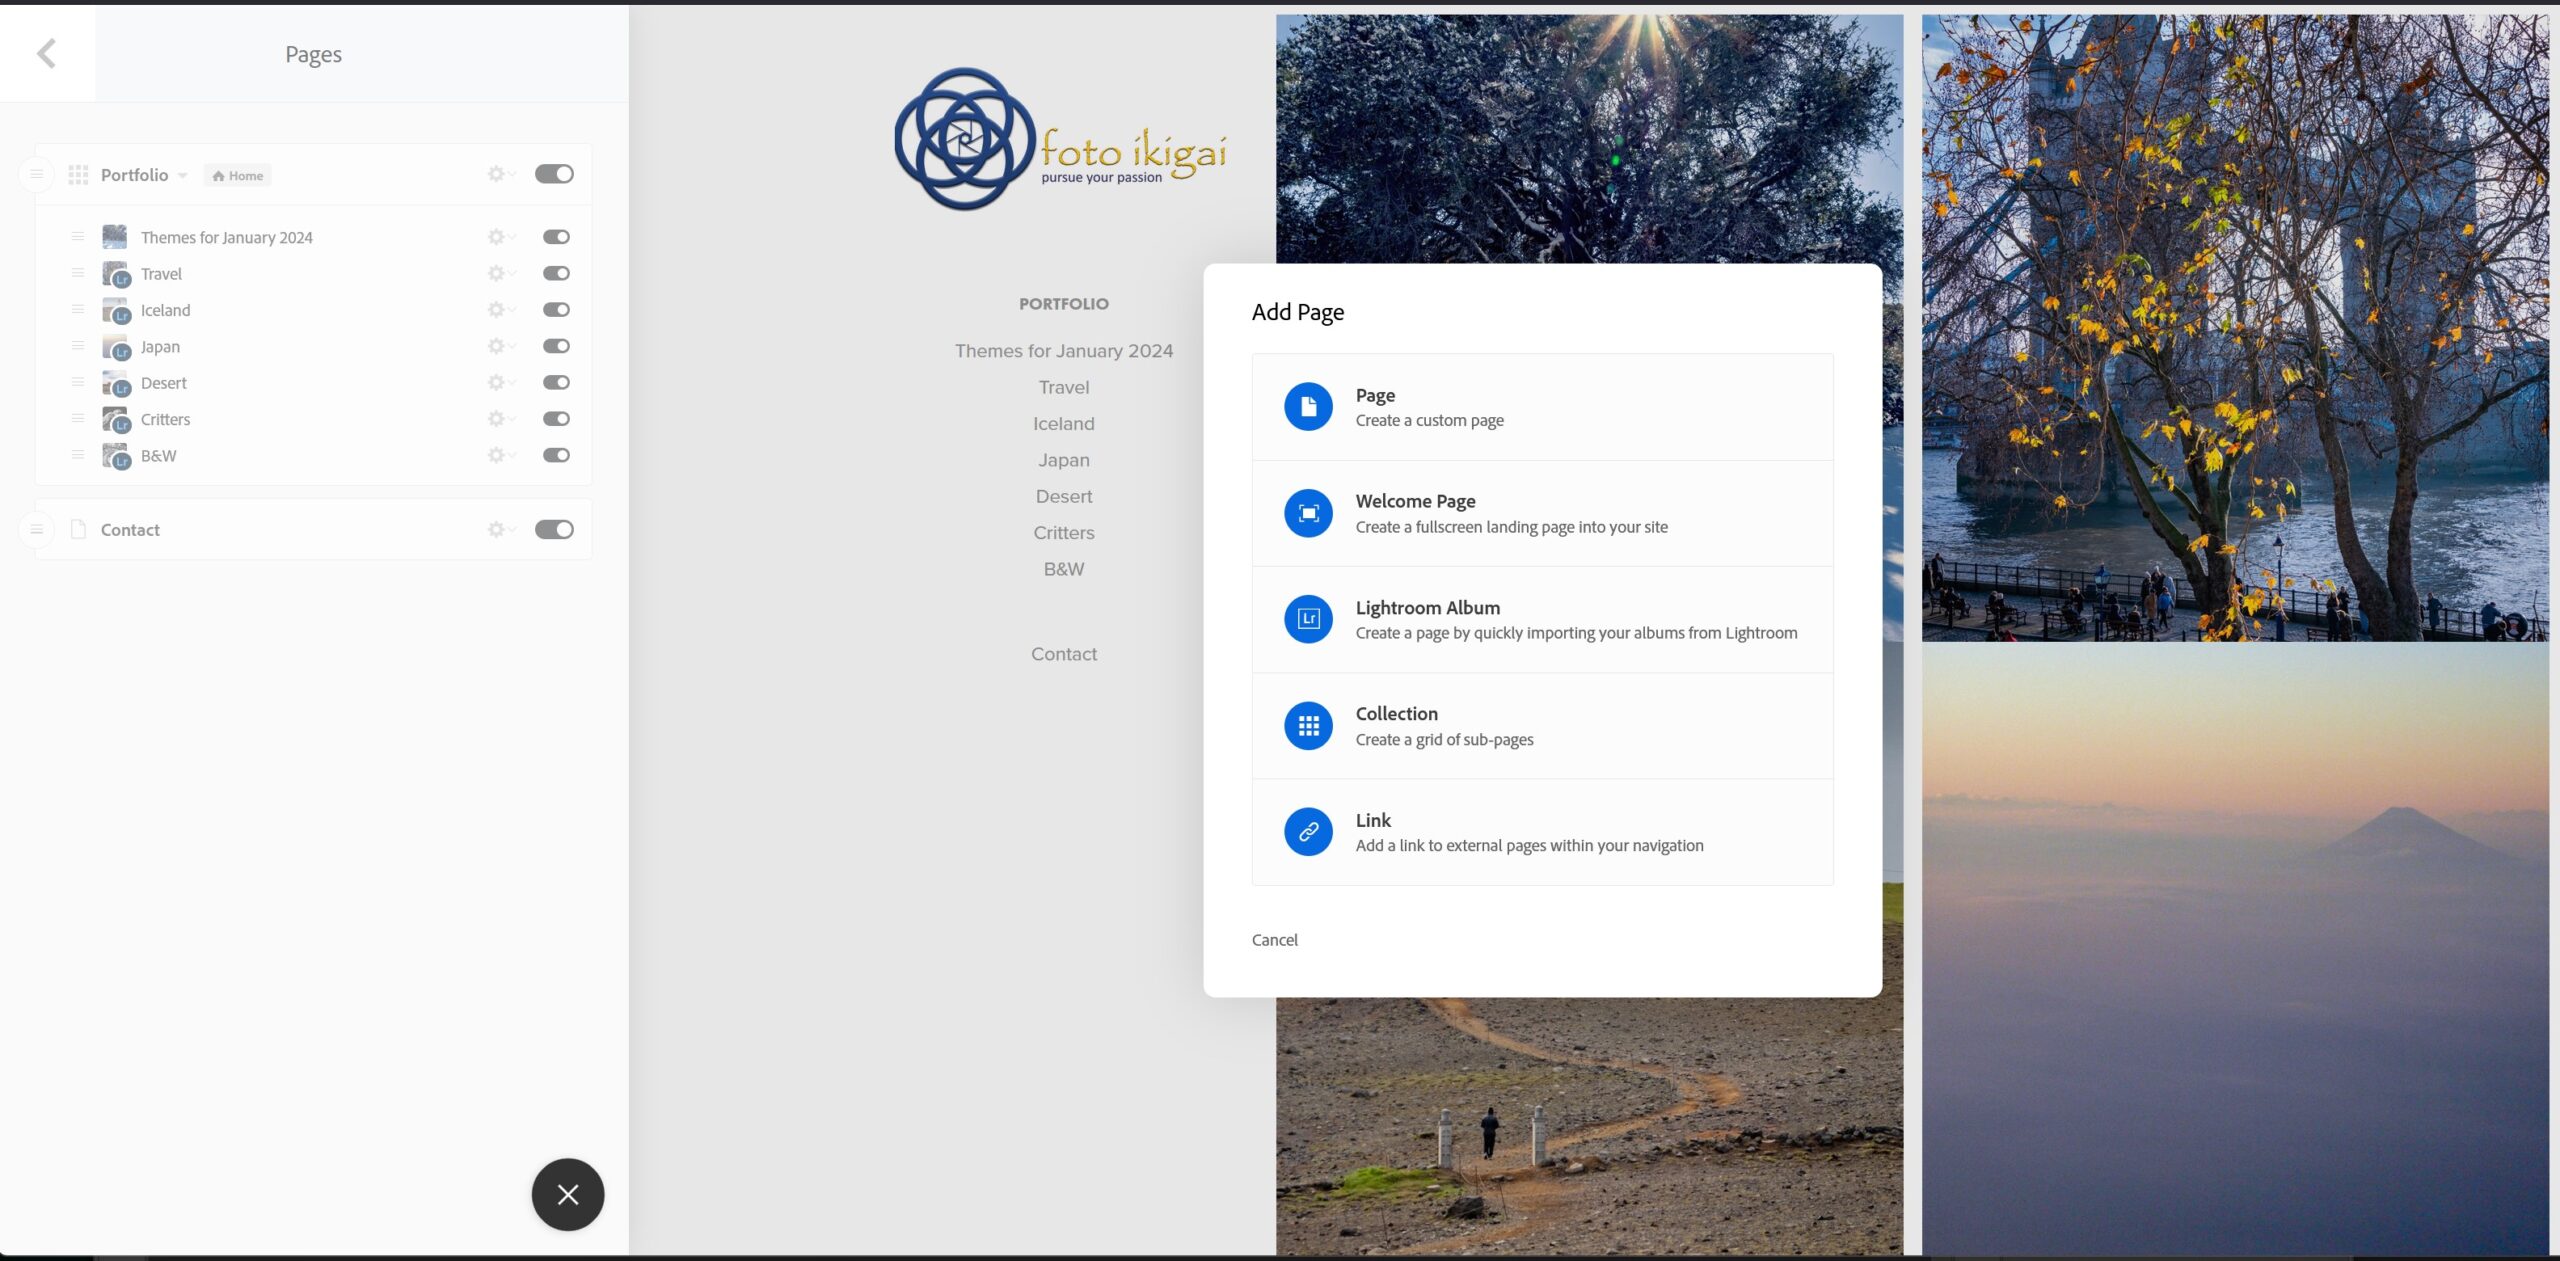
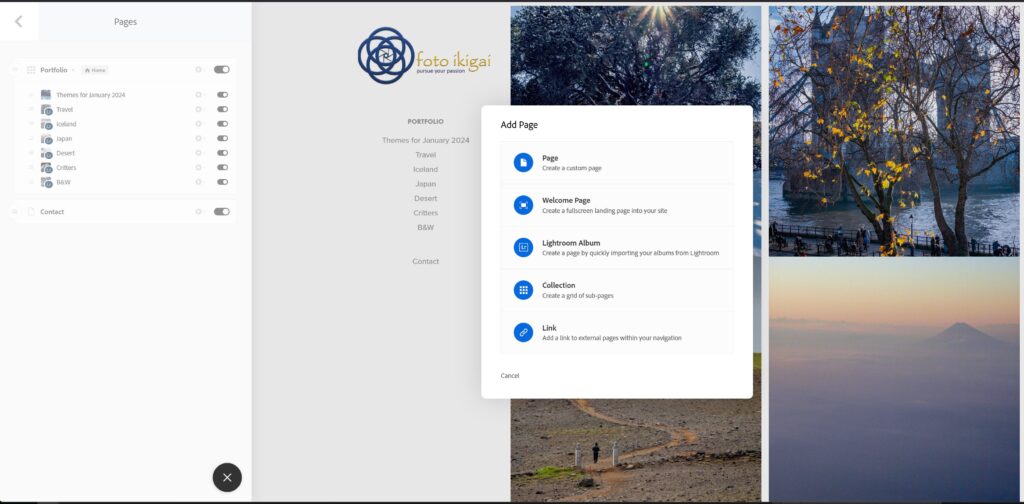
  4. You are ready to add content to your portfolio – click the blue circle + in the upper left to begin, next select what kind of page you want to build
    • I uploaded photos at lightroom.adobe.com, organizing them into albums. Your Creative Cloud subscription provides 100gb of space to store photos. Storing images here makes them easily available for building your portfolio pages. Right now, I only use this cloud storage for my website portfolio. But if you work on multiple devices like laptop, desktop, and tablet. Storing your content here makes them available everywhere.
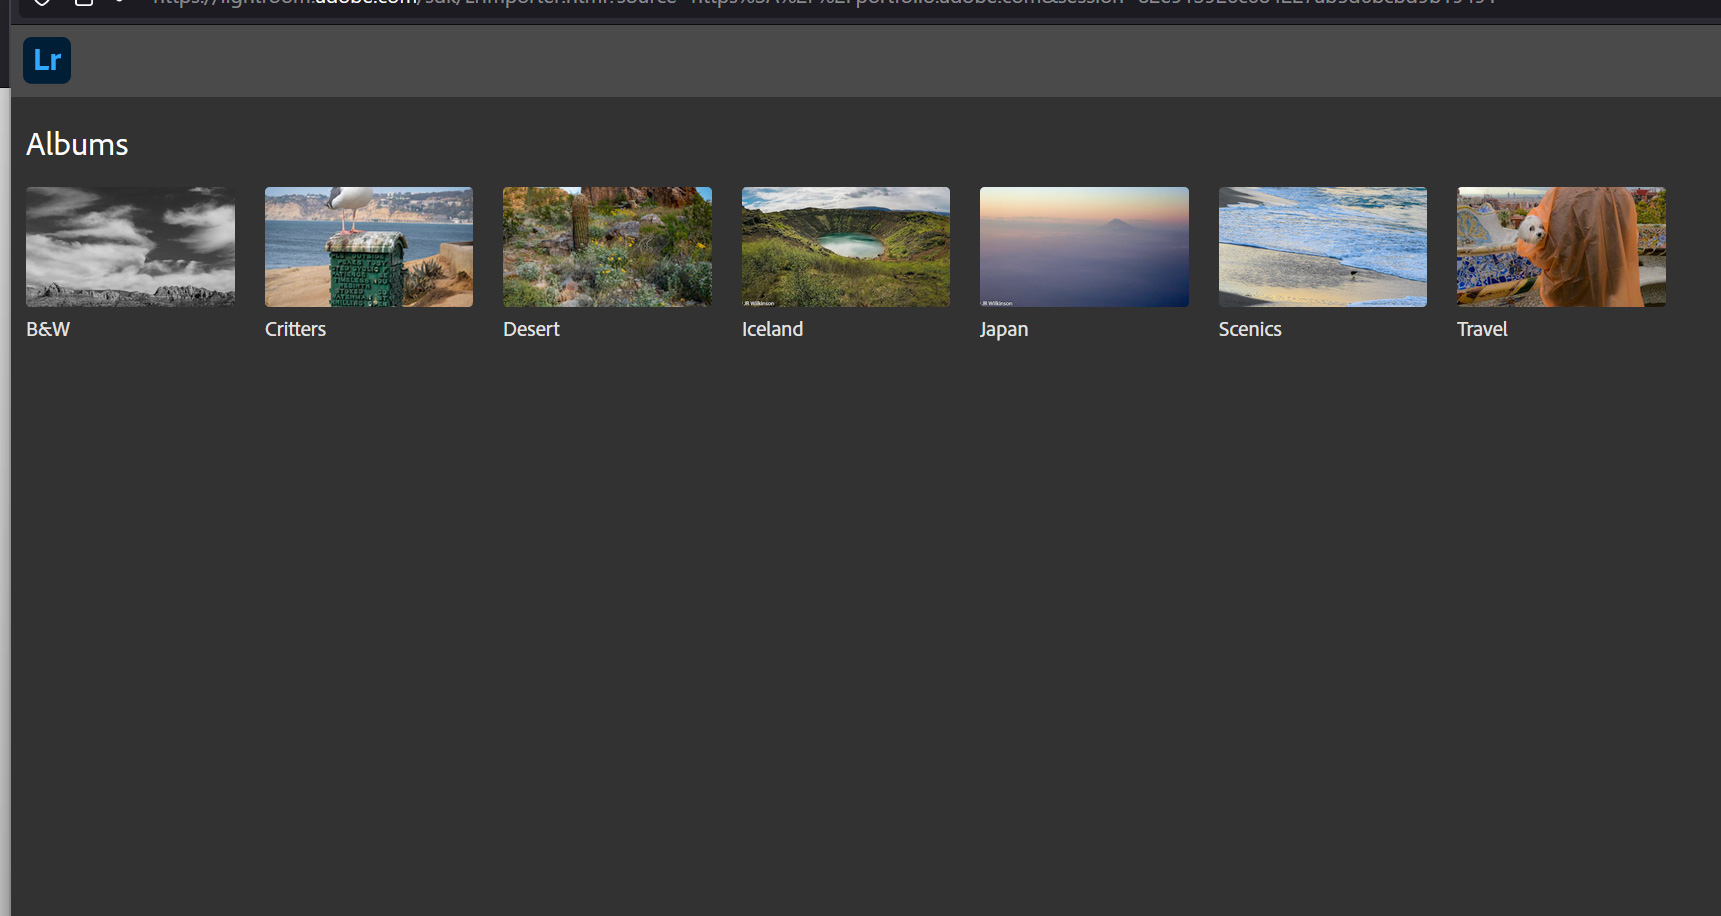
    • In the editor, click the + button and select Lightroom Albums. This will take you to your Lightroom.adobe.com webpage, & display your albums.
    • Select a Lightroom Album then Import Selected in the lower right. A new webpage will be created with those images.
  5. Under Settings/Domain Name: the portfolio website will be labeled <your adobe account name>####.myportfolio.com. Under Settings/Site Subdomain, you can change the first part of myportfolio.com. I changed mine to fotoikigai.myportfolio.com. They allow you to change this up to 5 times so it isn’t permanent.
  6. Custom domain – if you own or want your own custom domain for your portfolio. Under Settings/Domain Name, you can register/buy one through Adobe third party, NameCheap (good affordable domain registrar), or link one you already own or registered elsewhere.

To create a Page, click the blue circle Add Page + in the upper left. Then select the type of content – I’ve been using Lightroom Album.

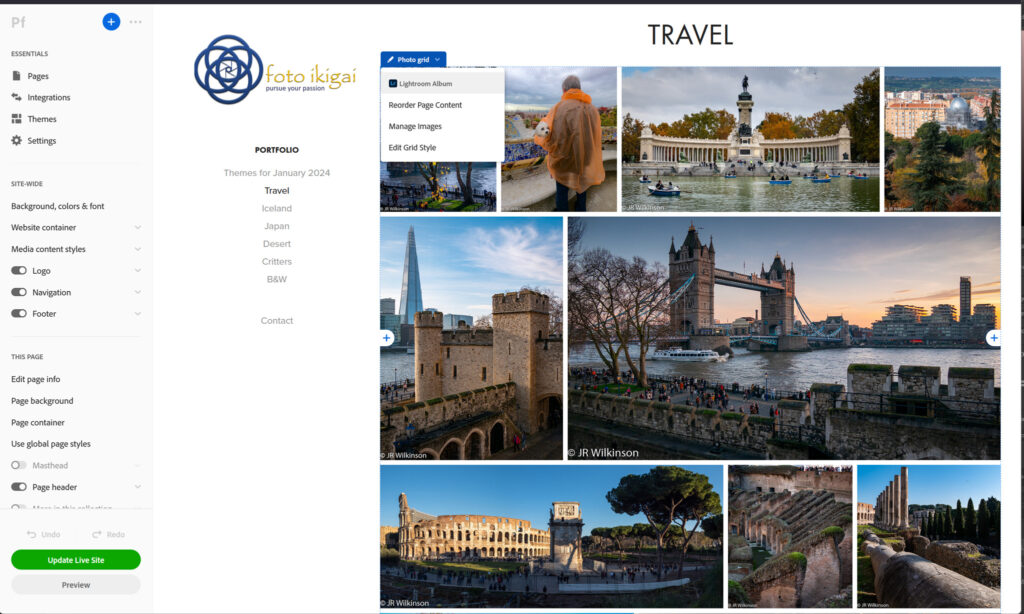
Once you create your portfolio pages, there are a few tips to reorganize your images. In the page editor, there are blue boxes in the upper left corner of each webpage element. Single-click these boxes for options on reorganizing the gallery.

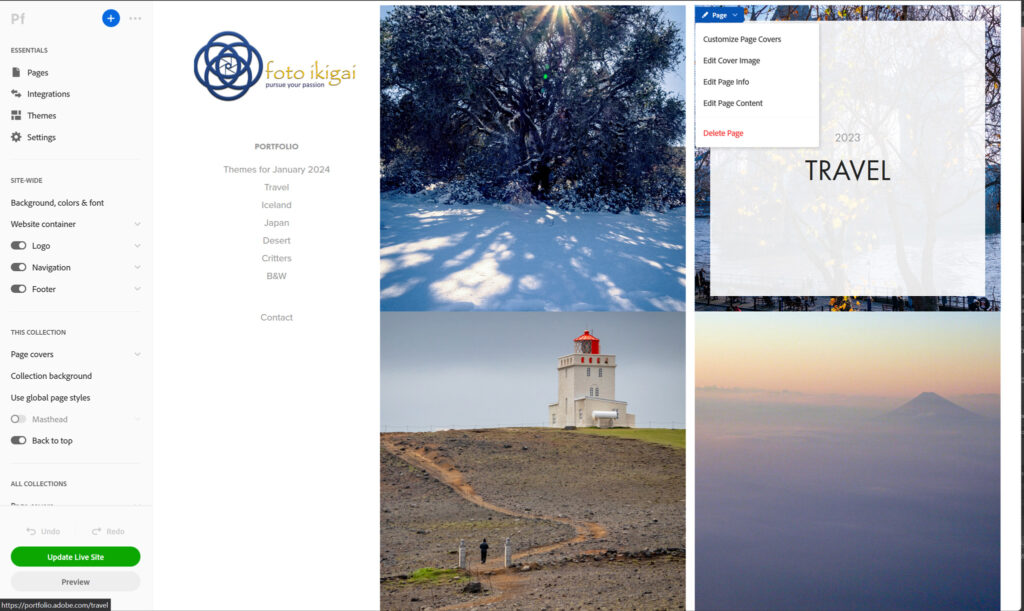
If you choose not to have a cover page and end up with a collection of album thumbnails. You can change which photo from an album is the cover image. Hover over the cover image you want to change, single-click the blue box labeled Page, then Edit Cover Image. Select the new image from the photo album to use as the cover then click Update Live Site to save the change.

As long as Adobe keeps the webhosting feature part of the Creative Cloud subscription. I think it’s a great add-on to their powerful photography, video, and graphic art software suite. 100gb of storage is plenty unless you store full-resolution images. They offer additional storage for a price of course. I’ll keep using Adobe myportfolio and assess its performance compared to independent webhosting. So far it looks pretty promising although the template themes are limiting.

Tutorial: Using Photoshop To Fix Curved Pano

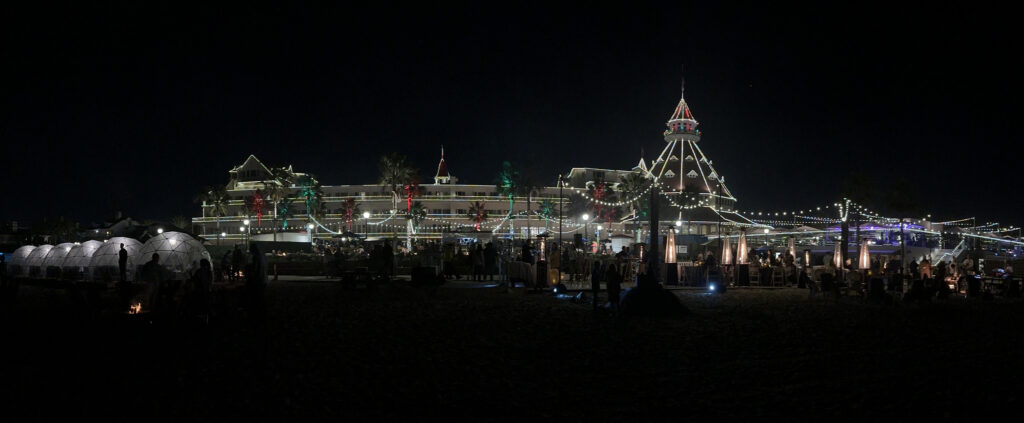
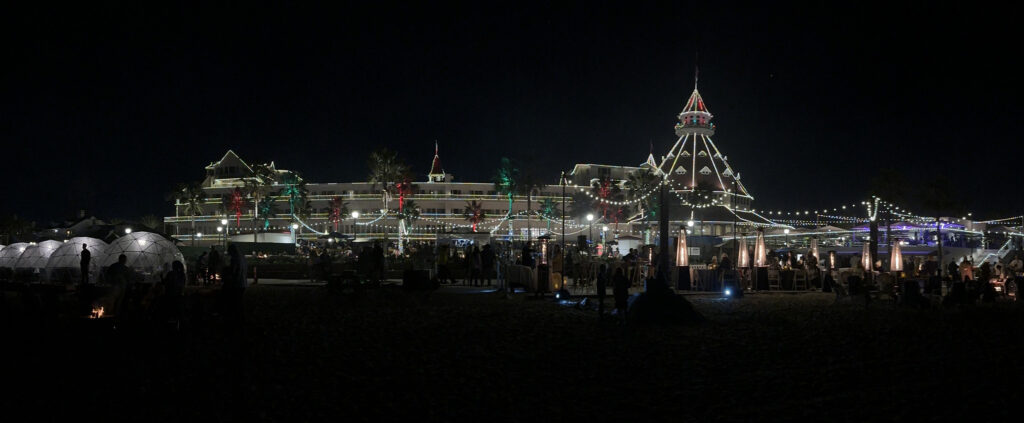
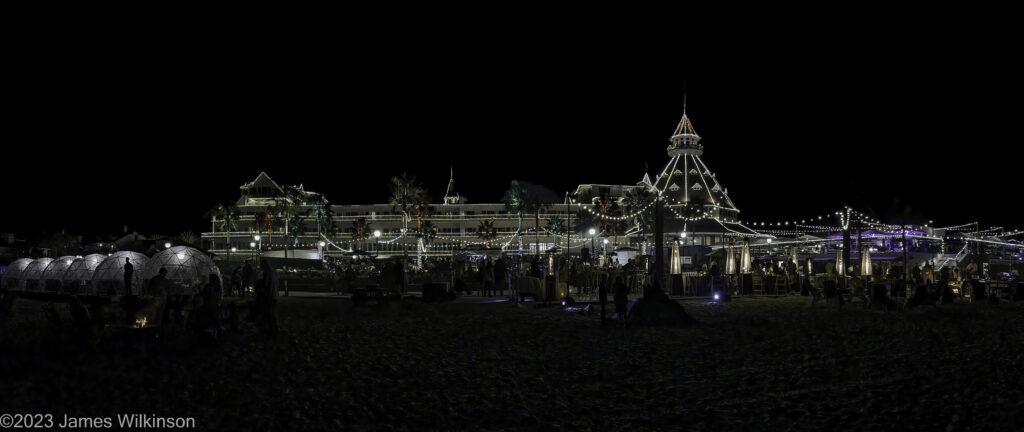
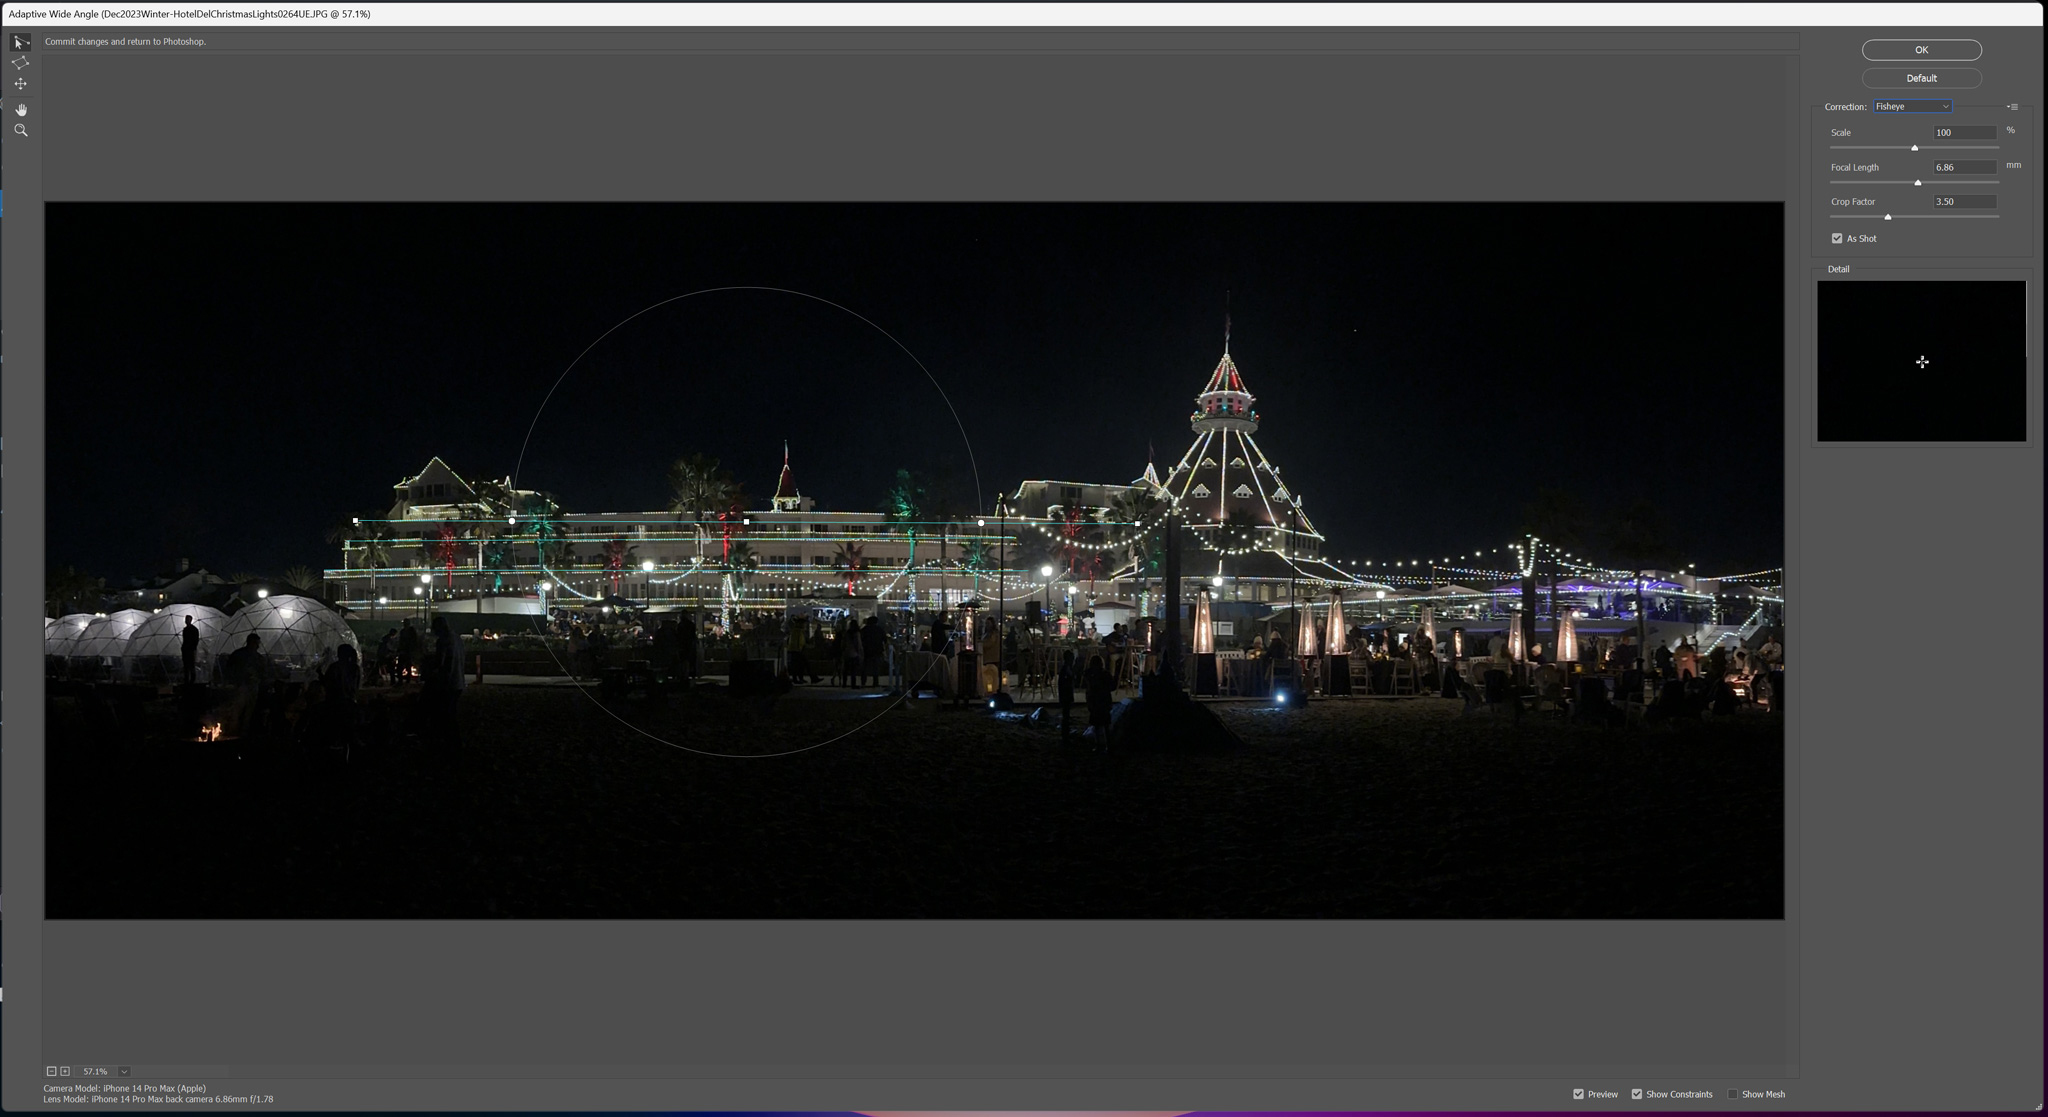
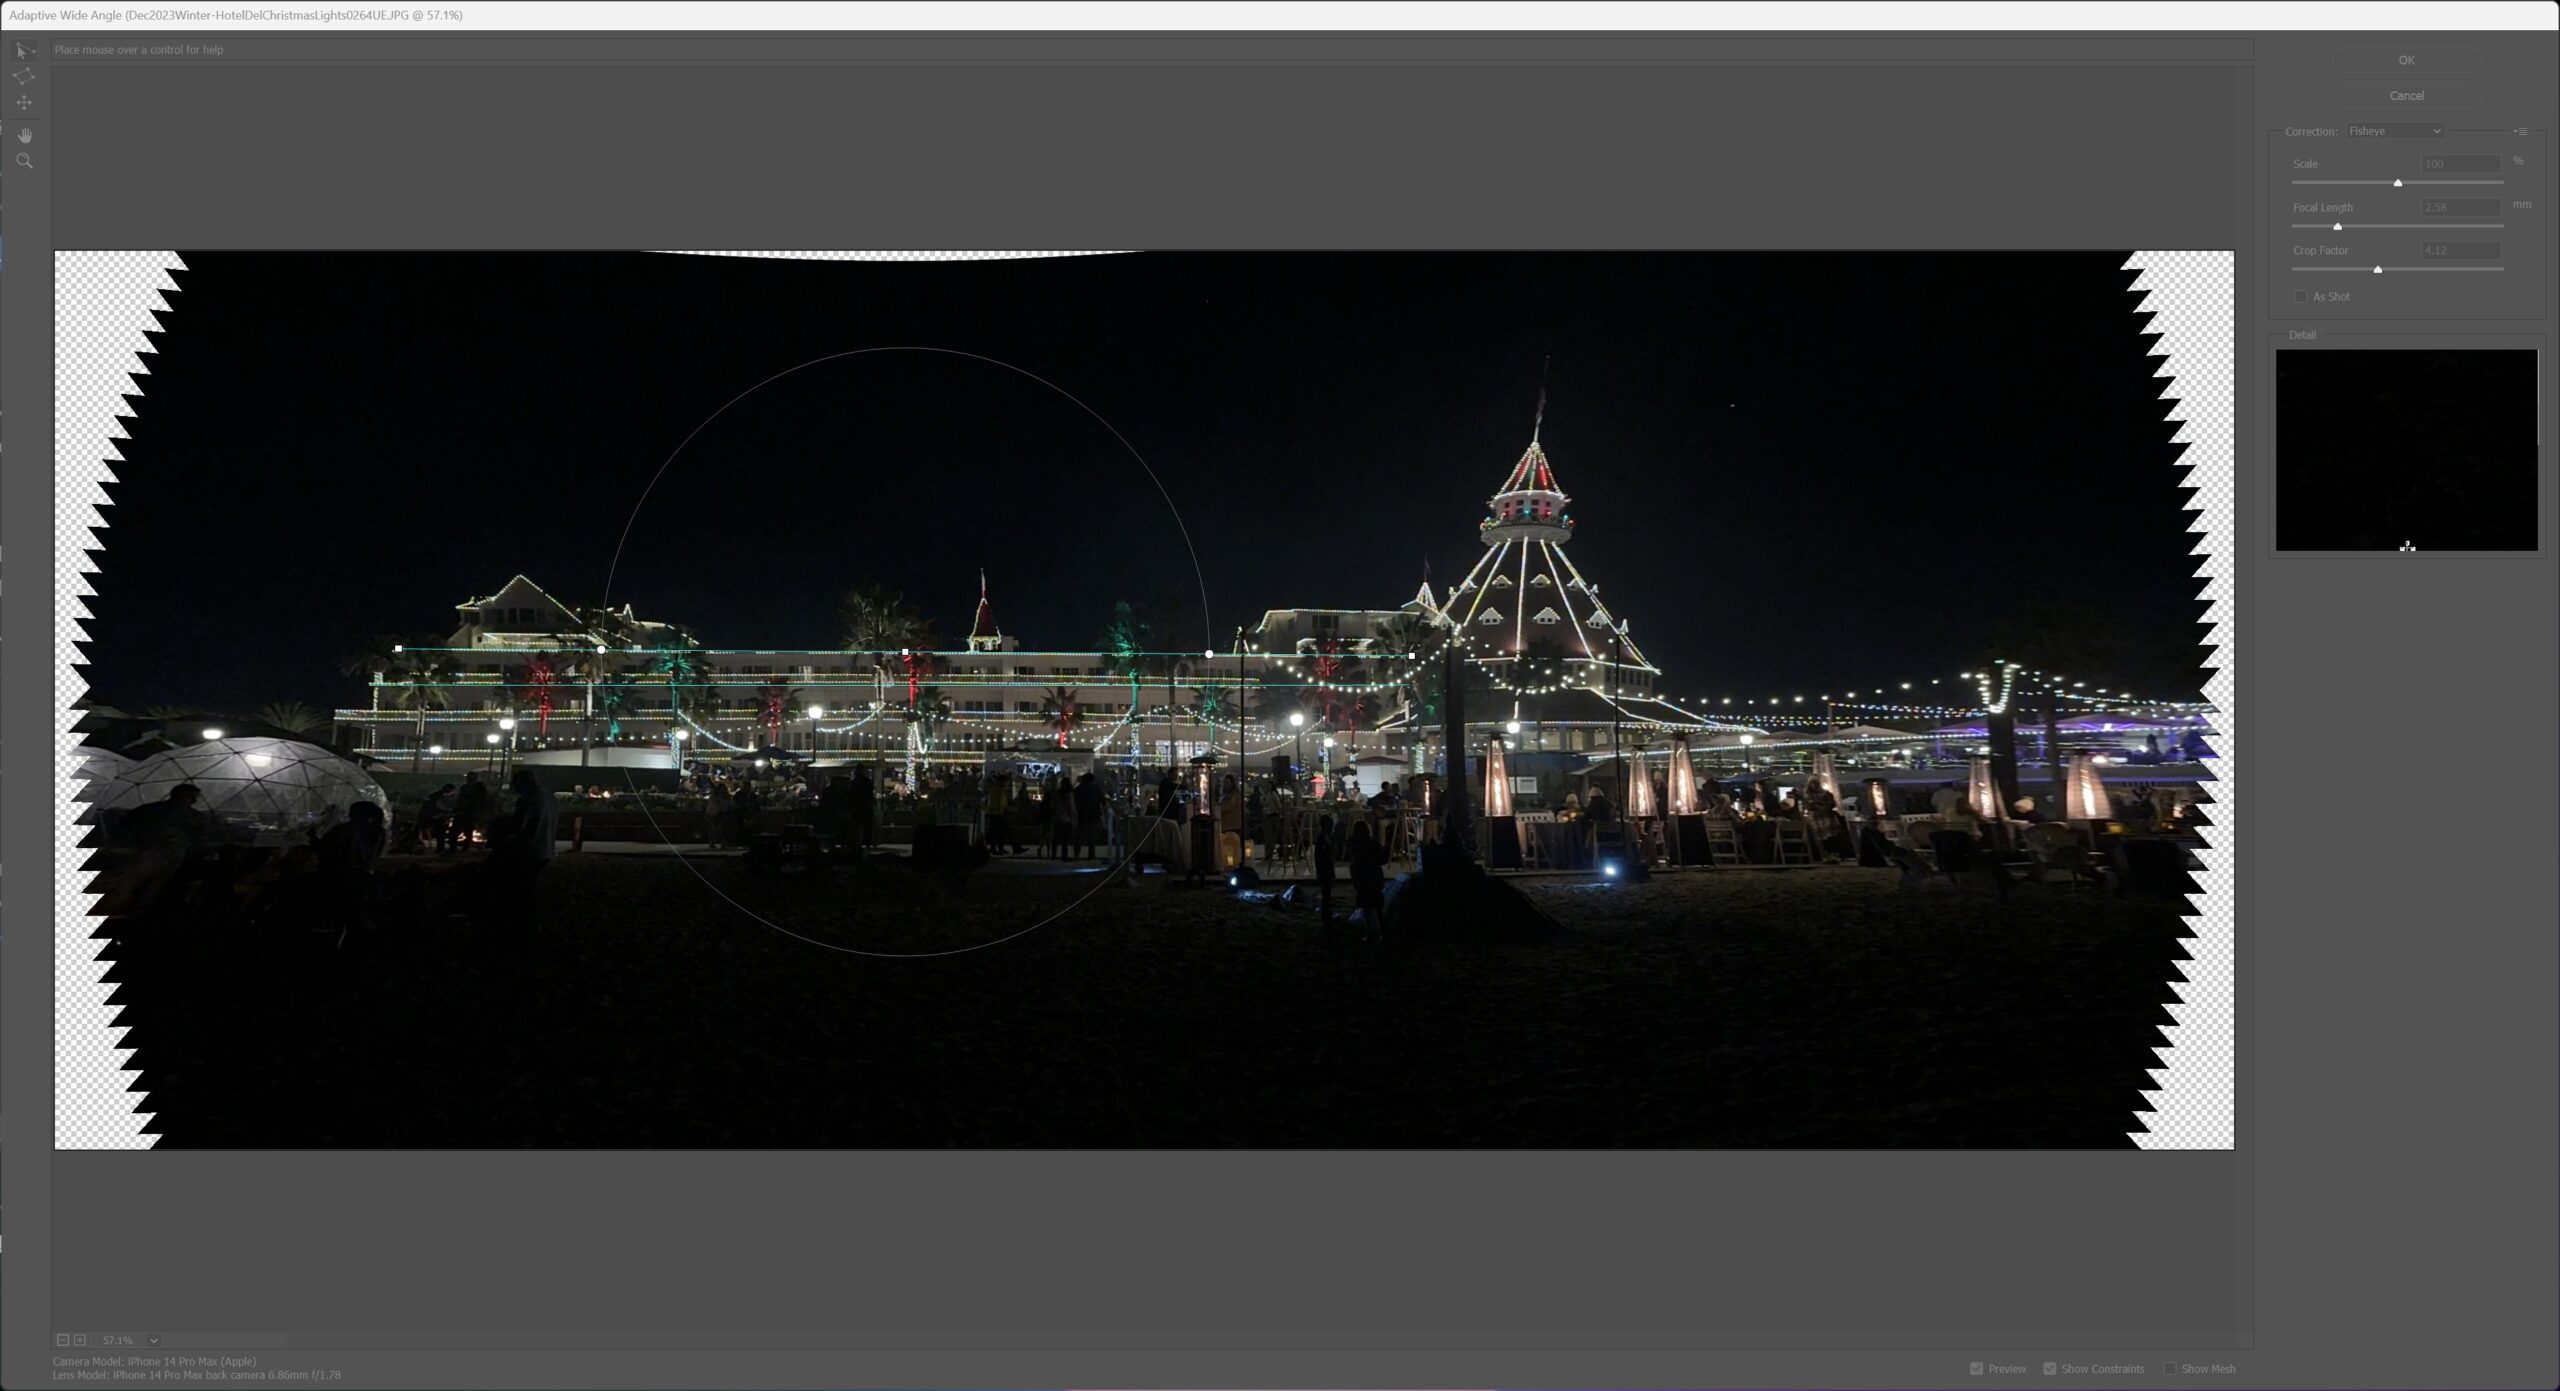
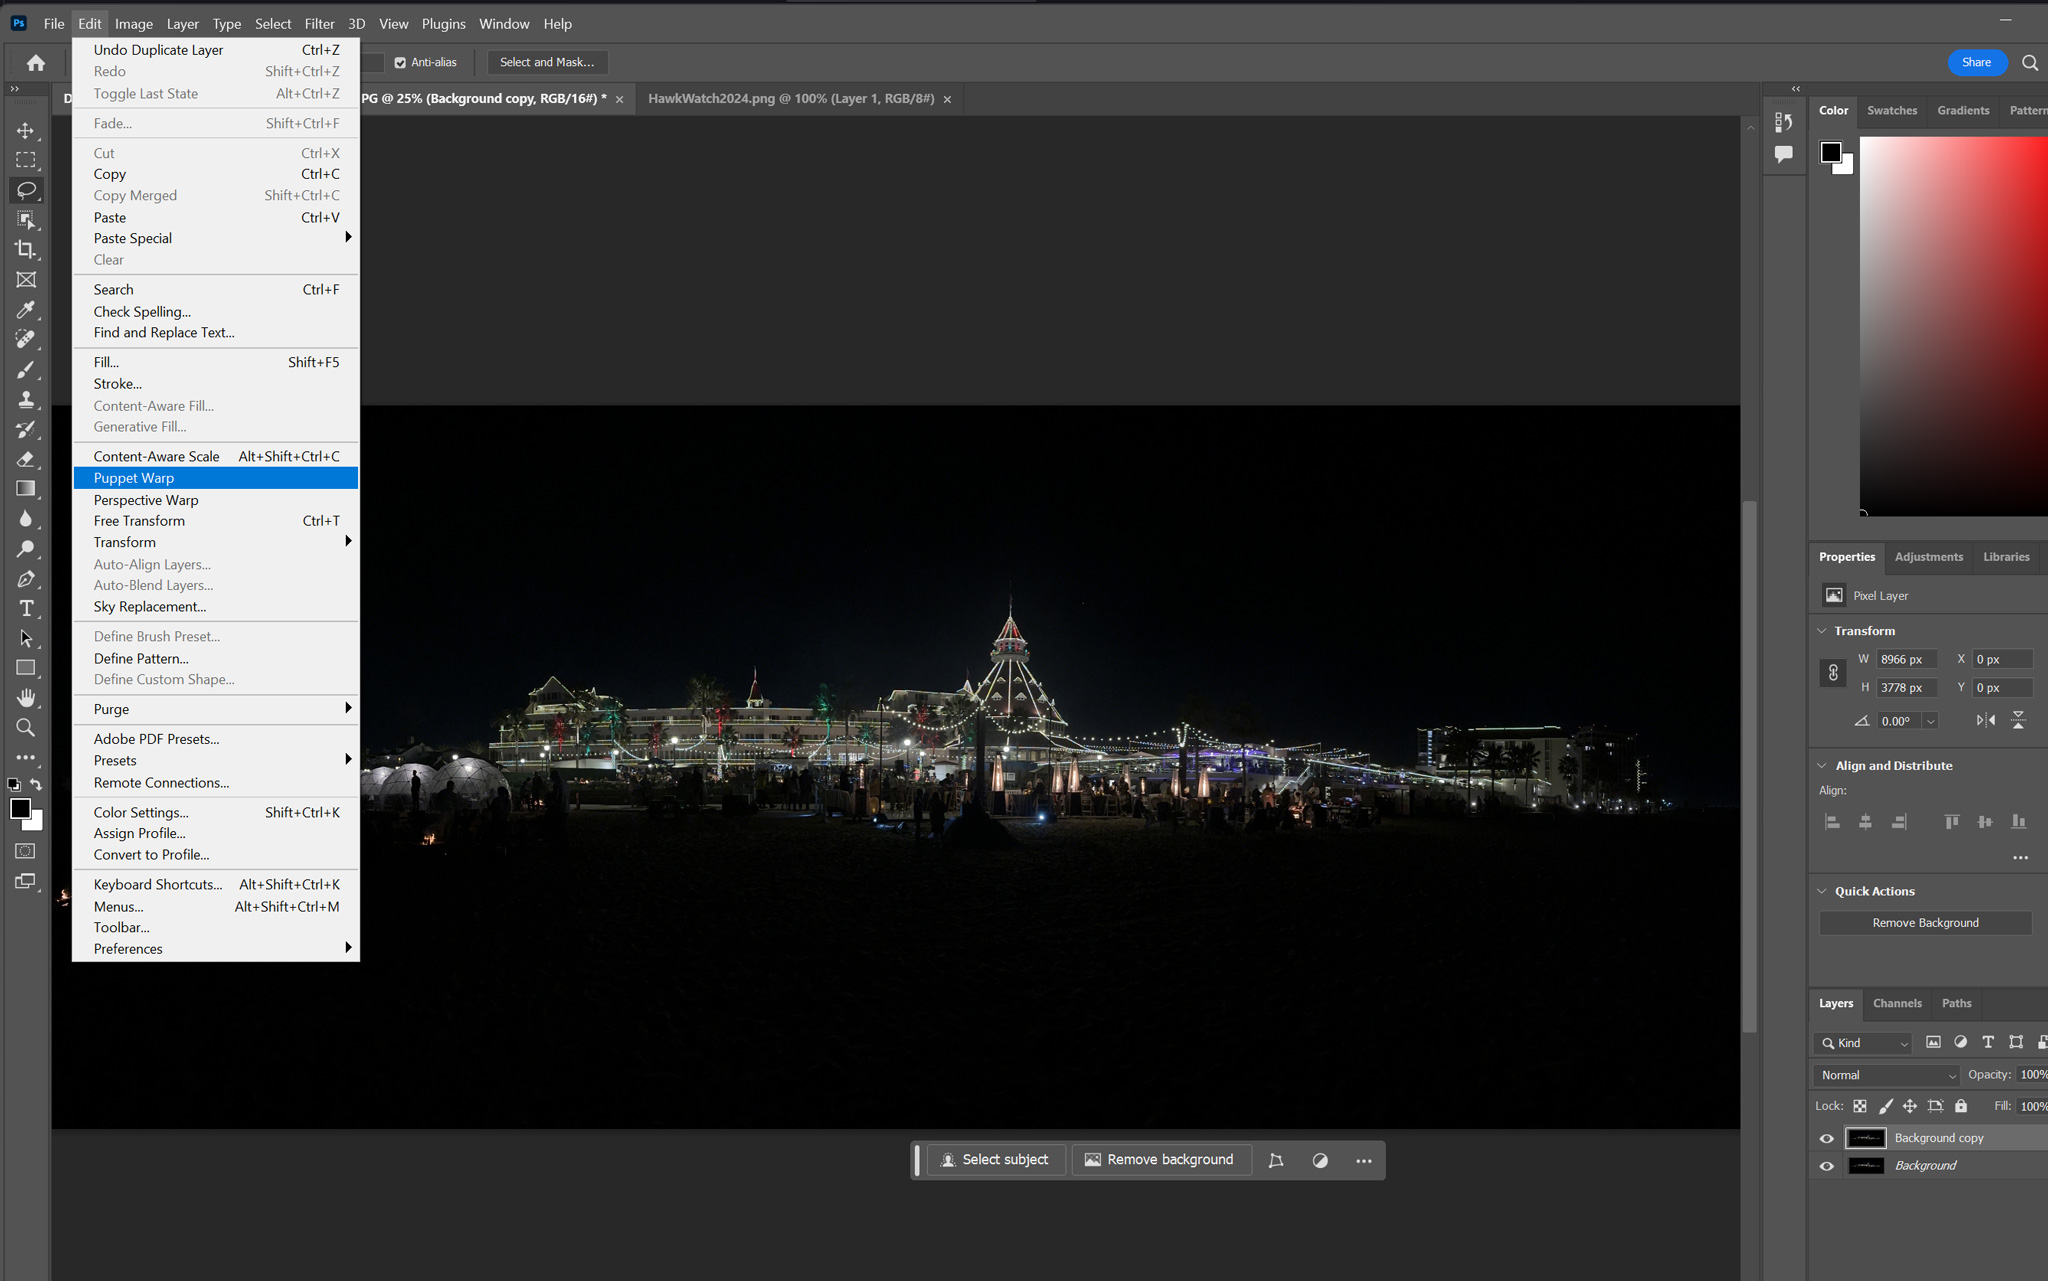
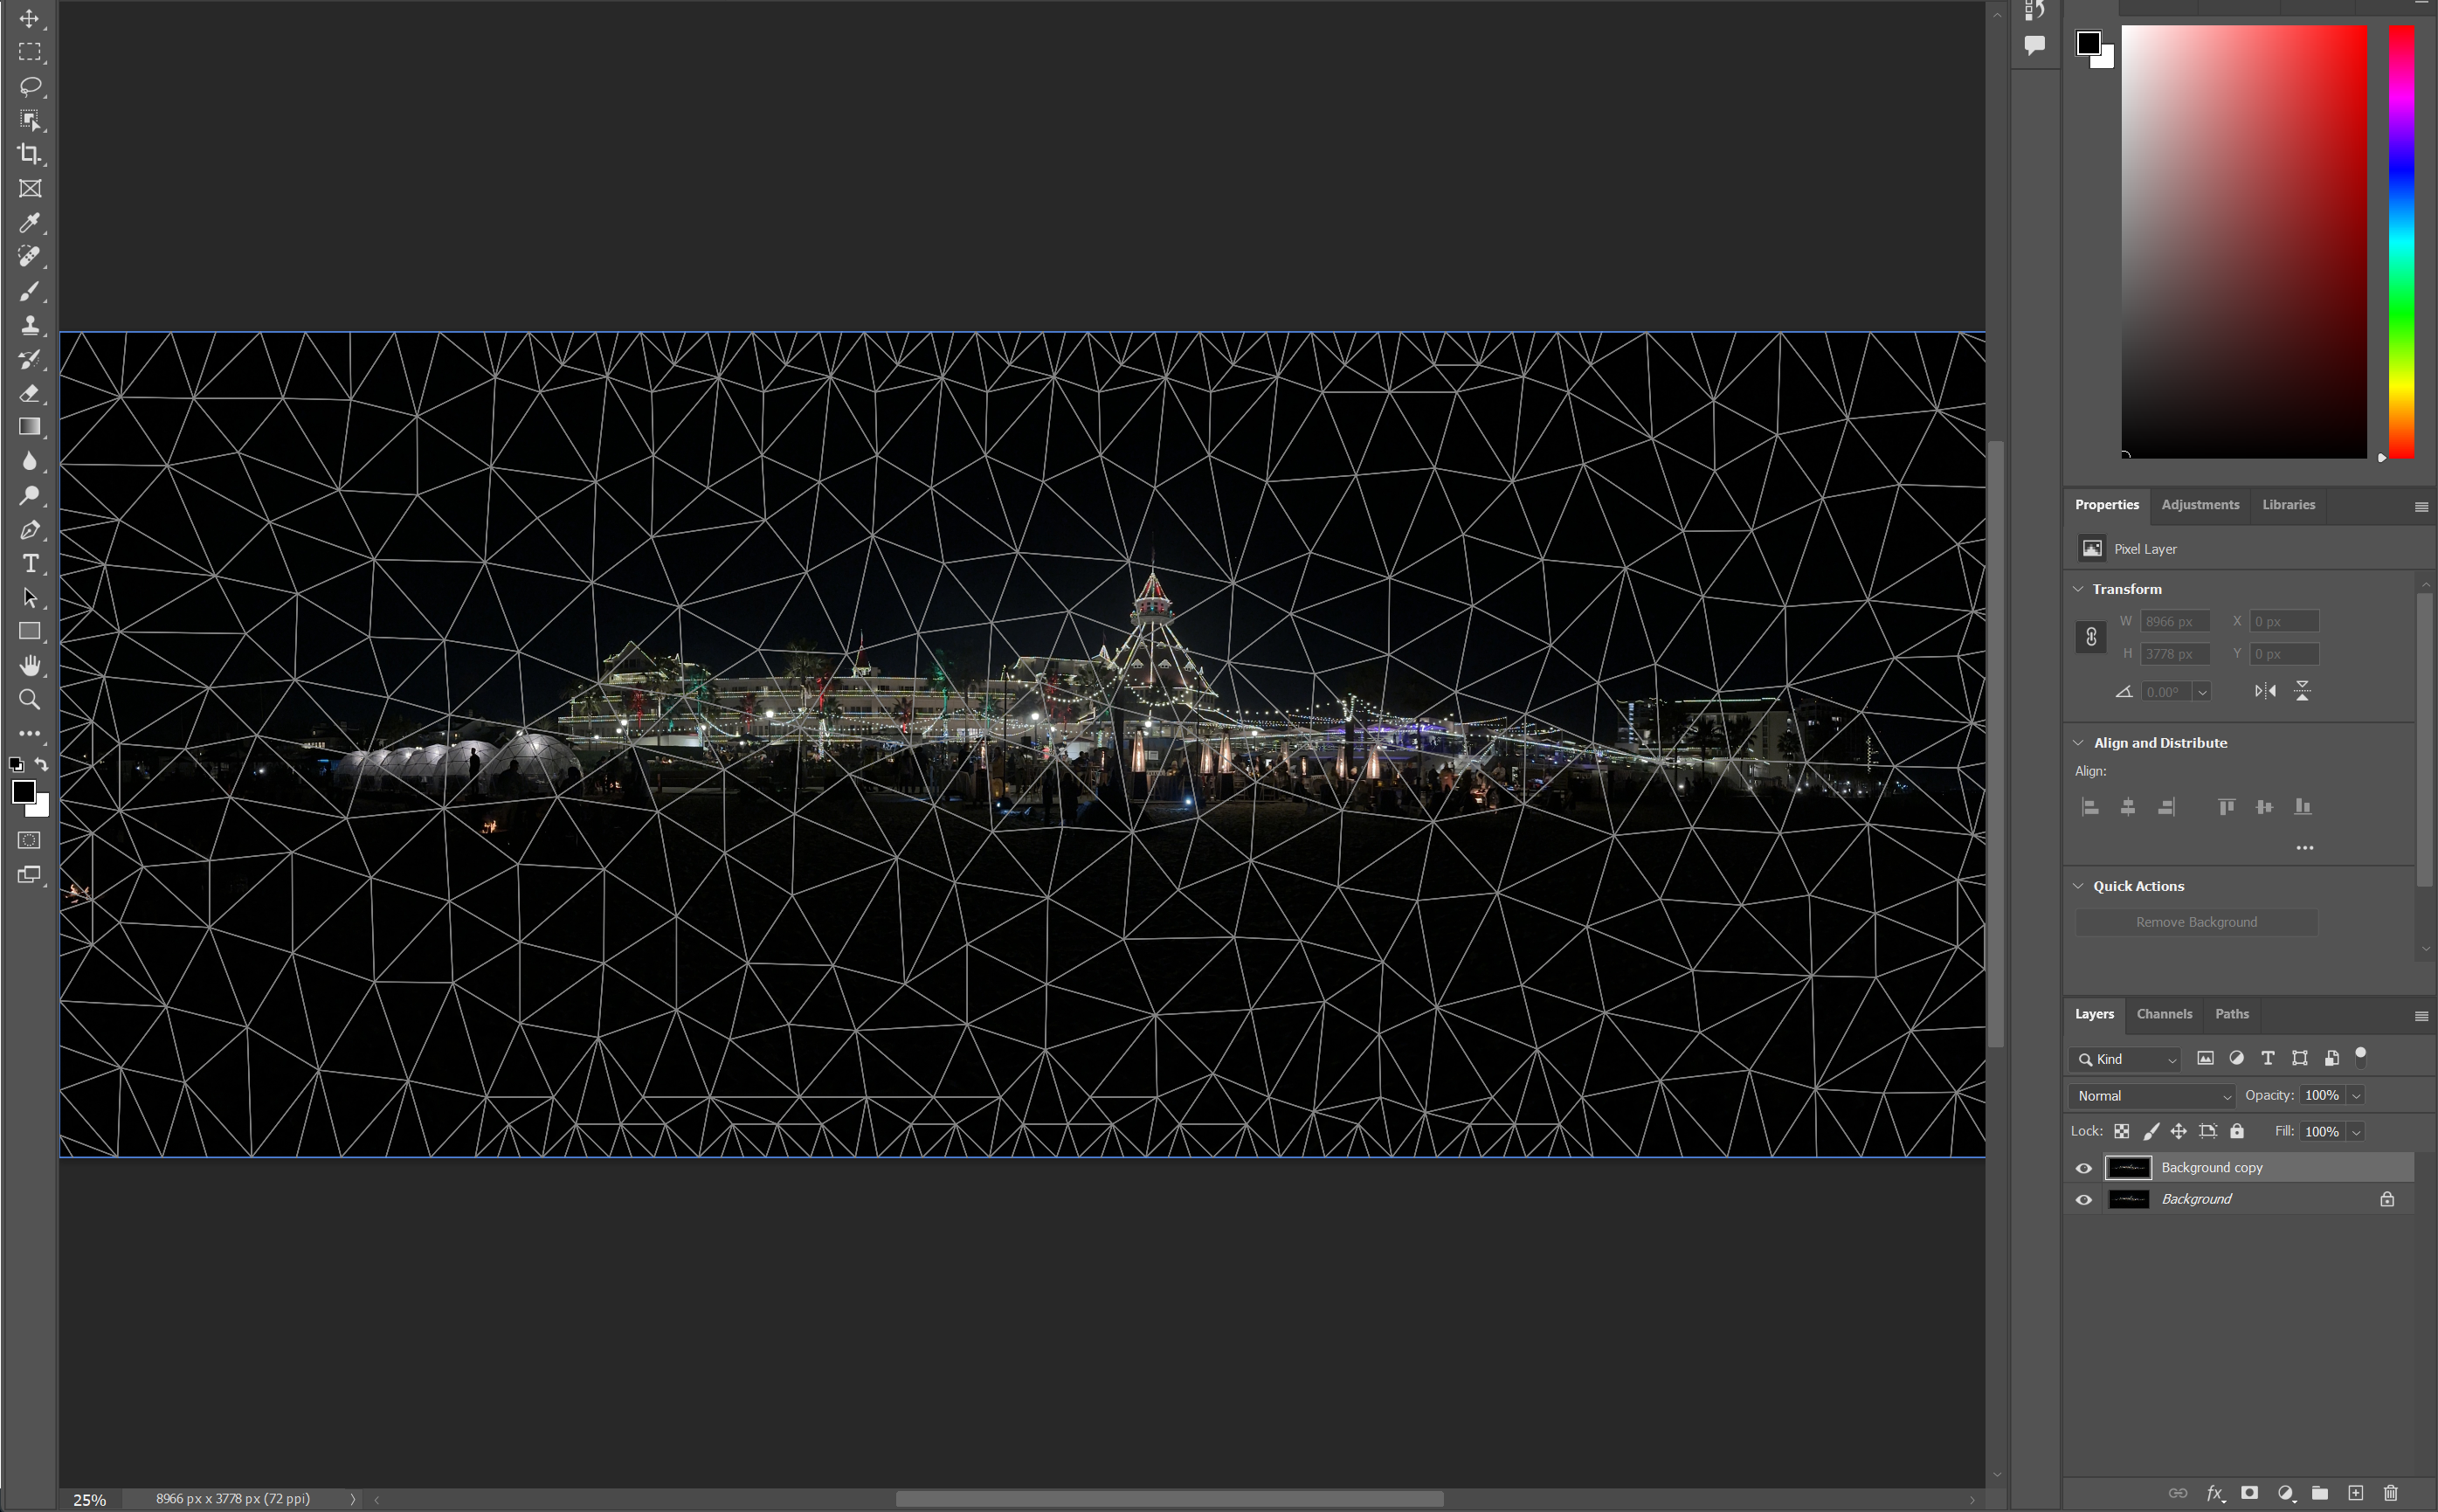
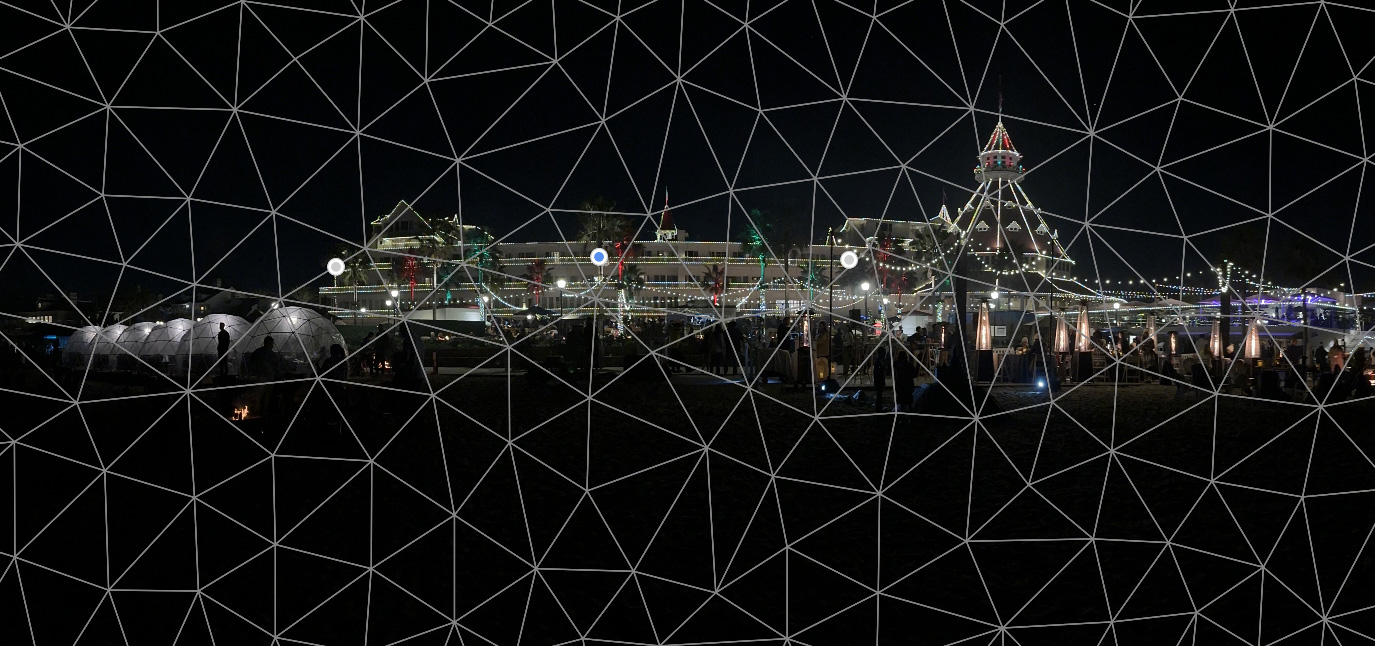
I enjoying taking panoramic photos with my cameras. iPhone photos, when held level, look pretty good. But sometimes an iPhone or stitched panorama is has barrel distortion and is bowed in the middle. If you google how to repair such issues, the search will recommend using Photoshop’s Filter-Adaptive Wide Angle. This can straighten the center of the image but can cause side-effects on the left and right sides. Photoshop’s Edit-Puppet Warp can correct specific areas of the image, leaving the rest unaffected. Here is an example of an iPhone Panorama with both corrections applied.
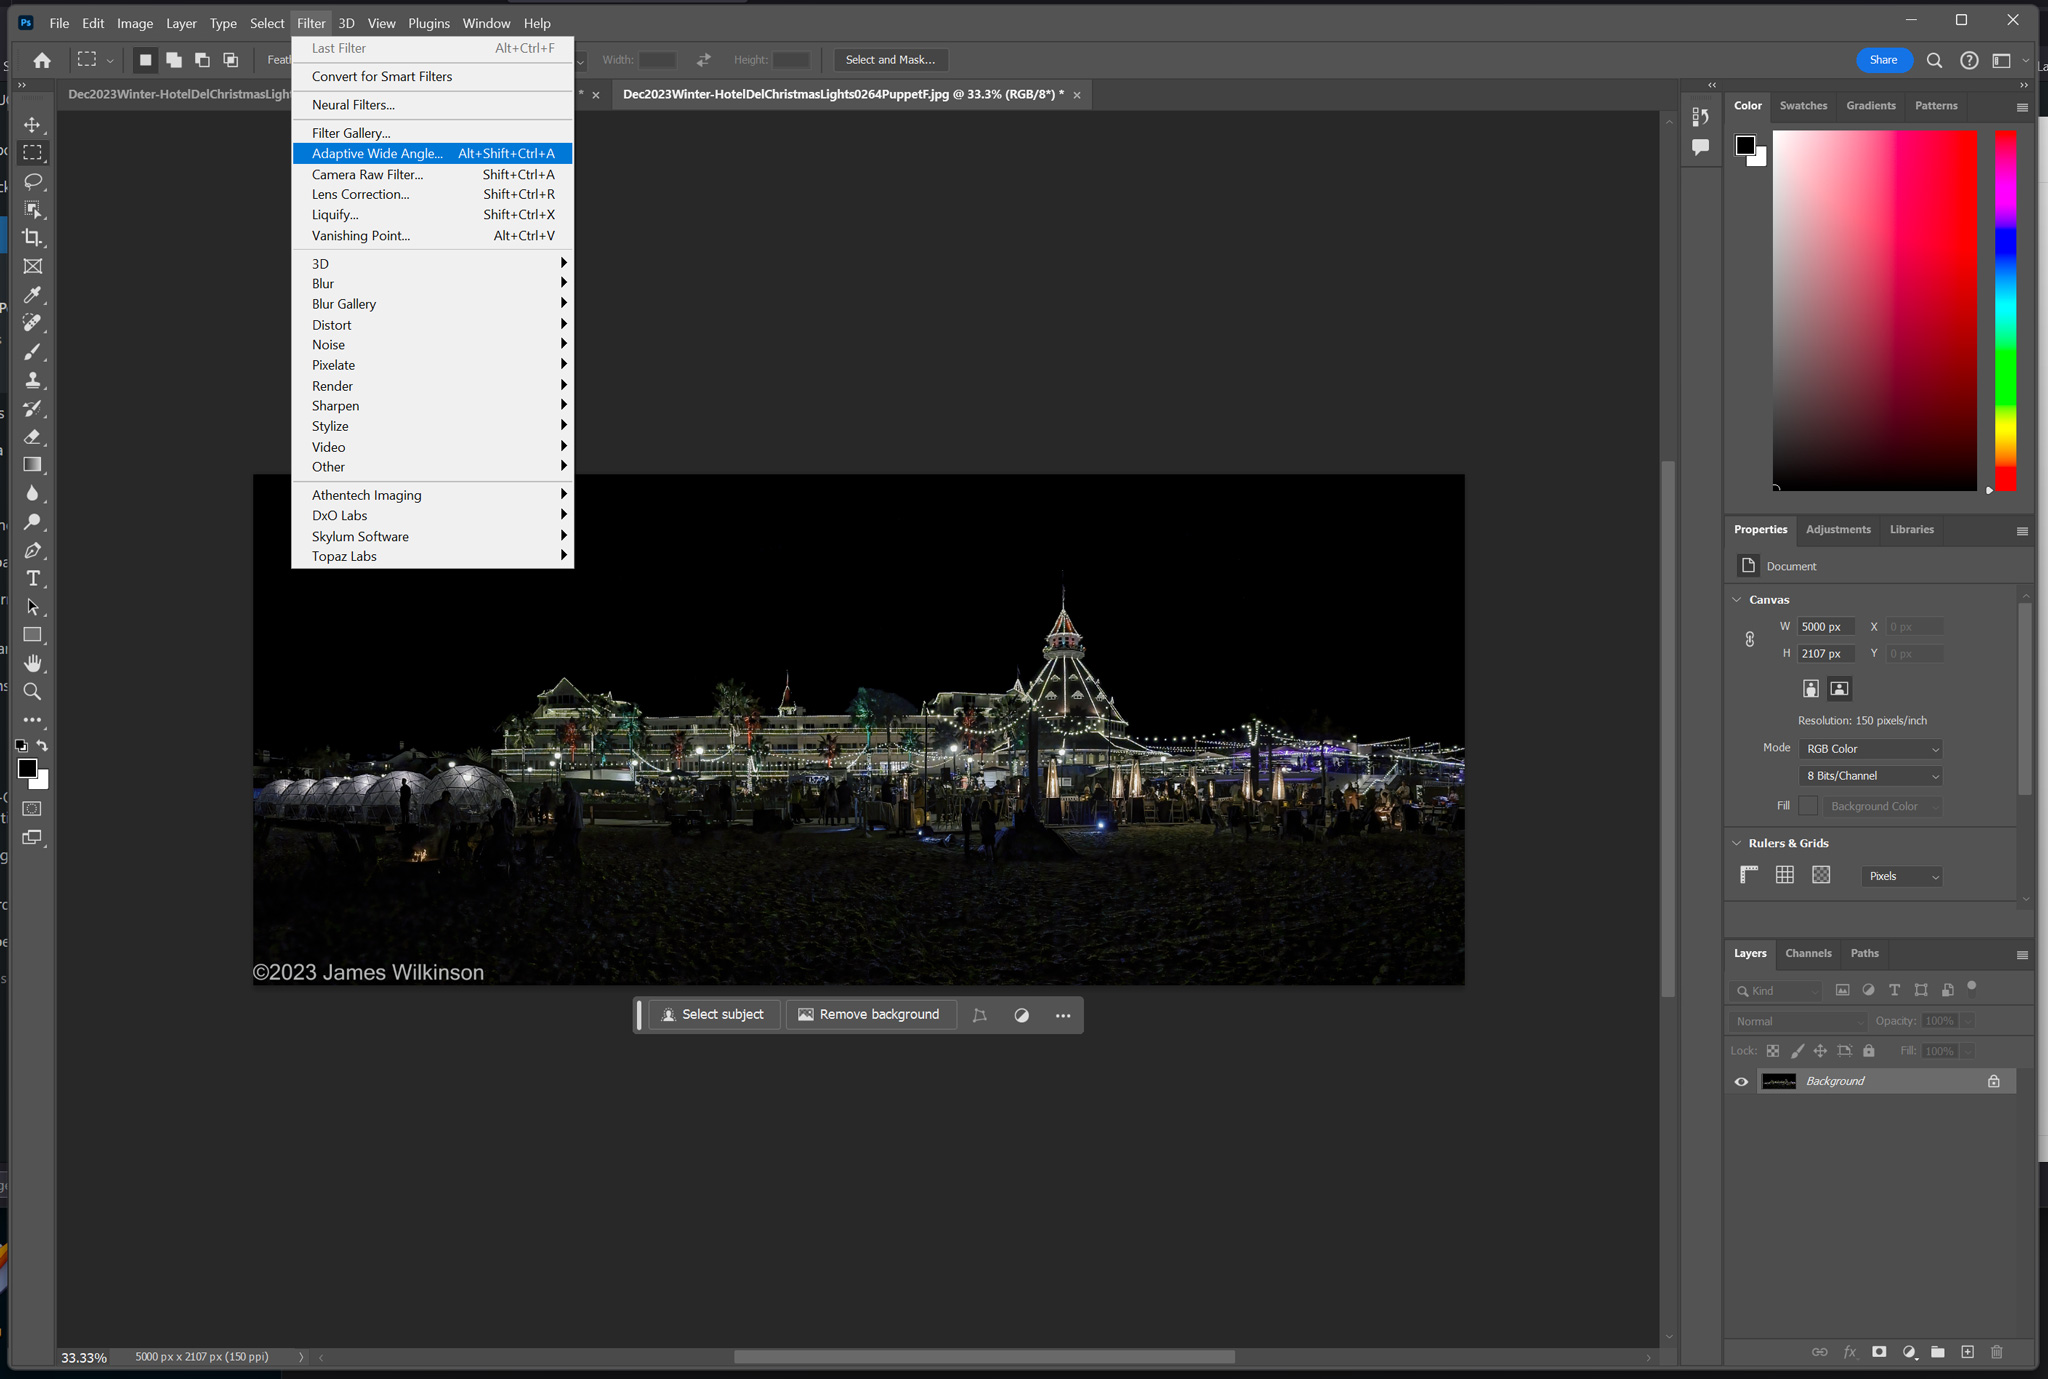
Note: these correction require a working layer (ie background copy) so if the controls are greyed-out. Create a background layer to activate these commands.

iPhone Hotel Del Coronado panorama uncorrected

iPhone Hotel Del Coronado panorama, Adaptive Wide Angle corrected. There is still a slight bow plus the image is slightly cropped.

iPhone Hotel Del Coronado panorama, Puppet Warp corrected. Notice the left and right edges are not straightened but also not distorted

Adaptive Wide Angle

Using Photoshop Filter Adaptive Wide Angle requires setting two horizon points, drawing a straight line as a guide then bending the line along the horizontal plane. Then you select & apply the lens correction (Auto, Fisheye, Perspective, Full Spherical). Fisheye will straighten the building but distorts the sides.

Puppet Warp

This is my first try at using Puppet Warp and I was impressed with its flexibility. You can apply corrections to specific areas without affecting the entire image. Adaptive wide angle affects the entire image, puppet warp affects only the area you work on.

Both corrections have their application. But I prefer the Puppet Warp’s ability to just affect the hotel and leave the edges unaffected. The Adaptive Wide Angle would be more for correcting wide angle lens distortion as I’m sure it designed to do.

Astrophotography Gear & Software

Some members of the UCSD Photography Interest Group are interested in astrophotography. This can be a challenging genre to master. Here are some tools & information that may help photographers create better images of the night sky.

Night sky photography requires a fast lens to help keep the ISO & shutter speeds as low as possible. Star movement or streaking occurs if the shutter speed is too long for the focal length. One tool that helps with this is a star tracker. I use a MoveShootMove Star Tracker and it allows minutes-long exposures (I use 2mins, ISO 1600, f4) with no star movement when properly align with Polaris. This is a very compact, affordable, simple to setup and use rechargeable device you attach between your camera and tripod. There are several affordable star trackers but it’s also possible to layer multiple shorter exposures and composite a night sky image.

If you do not use a star tracker, then image stacking software can help improve the image quality by reducing the noise. Image stacking software can also improve star-tracked image quality even further. Programs like Sequator will overlay and align several images to improve the resolution & noise of the night sky & stars. But if there is a foreground subject, it will require a separate single exposure to merge with the Sequator starry sky image.

  • Sequator for Windows PCs is a free program that’s fairly easy to use plus there are a variety of tutorials available online especially on YouTube.
  • Starry Sky Stacker for MacOS is a buy-once app popular for Macs. Similar to Sequator, it will stack and auto-align multiple night sky images.
  • StarStaX for Windows or MacOS is a free program for image stacking and blending primarily for Star Trail Photography.
  • StarXterminator & NoiseXterminator are paid plugins for Photoshop or PixInsight from RC-Astro.com. They can improve your processing of Milky Way images by separating the stars & Milky Way into separate layers. See this tutorial for more info: https://ucsdphoto.group/2024/05/processing-starry-images/
  • StarNet++ is a free executable that can remove stars from your astrophotography image. Like StarXterminator, it results in a starless 16bit tiff of the Milky Way. This allows the starless Milky Way tiff to be imported into Photoshop as a layer and processed independently from a stars layer.
  • Siril – is a free, popular technical night sky image processing suite for Windows, Mac, & Linux. But it requires watching some YouTube tutorials to understand how to get the most out of this powerful, free program designed by astrophotographers. You can add StarNet++ star eliminator as a scripting option.
  • Links & info to other programs like DeepSkyTracker can be found here: https://www.startools.org/links–tutorials/free-image-stacking-solutions
  • Other information on how to set your digital camera for astrophotography can also be found online at links such as https://www.startools.org/links–tutorials or on YouTube.

Dealing w/ iPhone Photo Moire

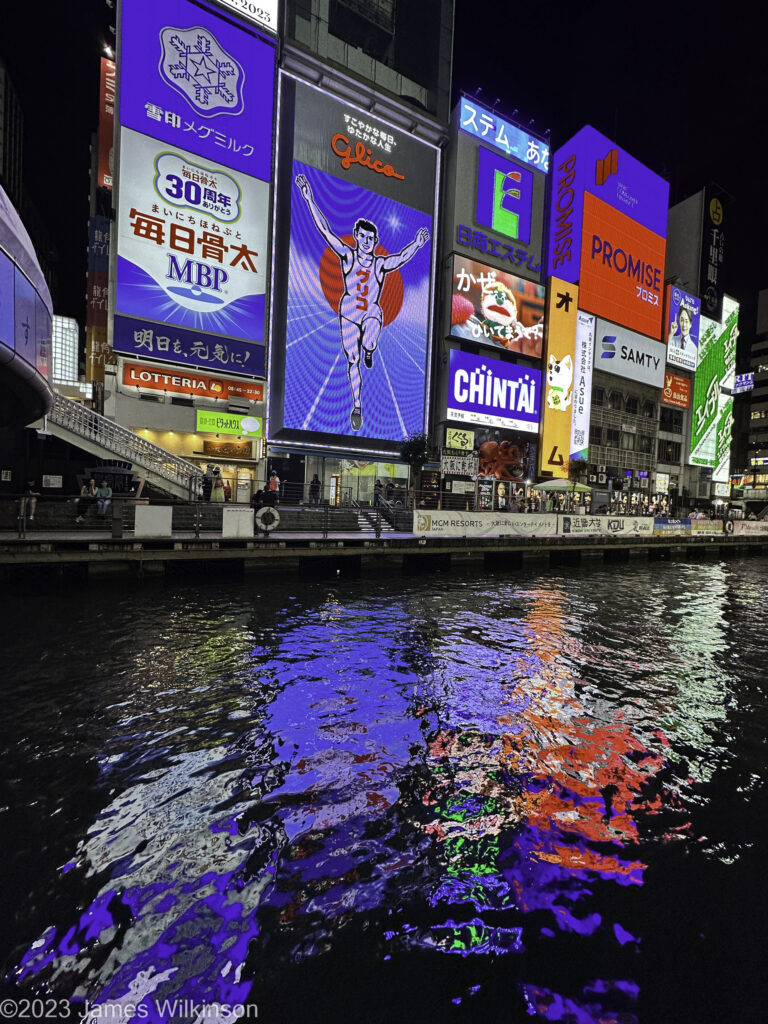
Problem: iPhone camera photo moire – I was photographing the ‘Vegas-like’ riverside signage at Osaka’s Dotonburi and discovered a terrible moire pattern in the iconic Glico Runner sign (photo 1). My Olympus digital camera did not have this problem but I preferred the glassy reflections of my iPhone photos. My Olympus photos were long exposures so the reflections were muted.
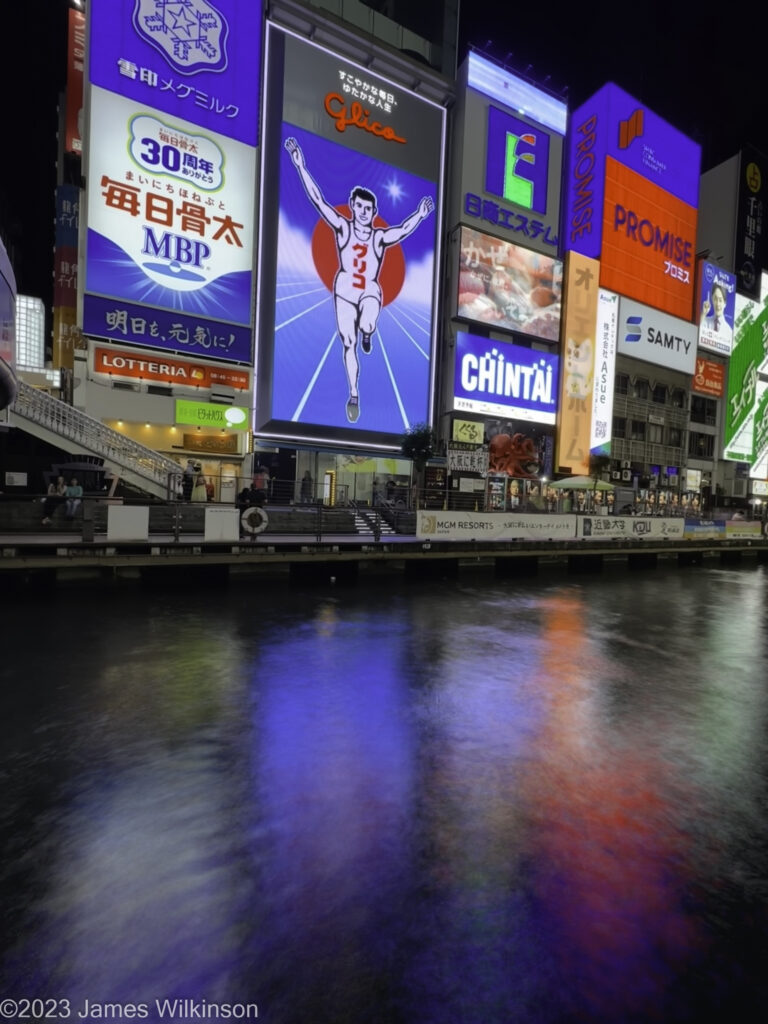
Solution: iPhone Live Image Long Exposure – since I had iPhone live photo ON, I created a long exposure (photo 2). That eliminated the herringbone pattern but also muted the color reflection like my Olympus camera long exposures. I loaded the two iPhone photos – the moire image & the long exposure – as layers into Photoshop. After aligning the layers since the long exposure crops a bit. I masked the long exposure image completely, setting it as the foreground layer. Then I erased everything on the long exposure layer, revealing everything from the short exposure except the Glico sign. I exported this combined image as a jpg with non-moired sign and glassy river reflections (photo 3).
Perhaps, if I manually adjusted the shutter speed in the iPhone camera, the problem may have been avoided. But I did not notice the issue until the next day so this was the best solution.

Cell phone camera technology & AI are outpacing standard digital cameras by miles. But a digital camera in the hands of a competent photographer can still generate phenomenal photographs beyond the scope of a cell phone camera. At least for now in mid-2023 – think wildlife, birds, sports, and astro photography as examples. Still the adage ‘the best camera is the one you have at hand’ is true and that tends to be your cell phone camera. But even with the latest iPhone digital imaging technology, great weather-sealing, and manual camera apps, sometimes the cell phone camera falters.


Film Simulations

Fujifilm cameras with their built-in film simulation settings are currently very popular for quickly generating images (jpgs) for social media. Other camera makers have camera menu settings or profiles such as ‘Vivid’ or ‘Monochrome’ that produce in-camera jpgs with similar results. But Fujifilm cameras take the color science further, by adding ‘analog film’ simulations. These result in photos that look like they were taken using a film camera using Fuji or Kodak roll film. These film simulation effects can also be applied to videos shot with Fujifilm cameras.

What are film simulations? They are basically a manipulation of the color and contrast to emphasize different color spectrum. Some presets even add grain to truly emulate particular film characteristics. Adjusting in-camera digital sensor settings can result in a photo that emulates a particular film stock. When I shot film, I chose Fuji film when I wanted to enhance the green; I’d use Kodak Velvia for neutral flesh tones; Kodachrome for reds; Ektachrome for blues.
There are websites dedicated to different camera ‘film recipes’ that photographers can program into their non-Fujifilm cameras. There are additional recipes for Fujifilm cameras (for specific sensor generations) that can also be added. Most newer digital cameras have custom settings that can save these recipes then apply them to jpgs when dialed-in.

Sources for film simulation presets:
Of course you can Google ‘Film simulation presets‘ and find many available. The ones I’ve tried are:

  • FreePSDvn.com – has many free presets organized by style or effect. They ask for a coffee donation if you find them useful.
  • DXO Filmpack – commercial film simulation with a 30-day trial. This is a great set of presets especially if you want to try nostalgic film processes as well as Agfa, Fuji, Illford, and Kodak film simulations. Wait for Black Friday when this goes on sale.
  • Nikonpc.com – this is a resource for the Nikon shooter. Unlike digital darkroom presets, this site has in-camera film simulations you can program into your Nikon camera. Then your Nikon can generate jpgs in-camera like Fujifilm cameras. Film simulations are selected from the in-camera menu and can be programmed to the custom buttons.
  • FujiXWeekly.com – has a collection of film simulation recipes that are compatible with Fujifilm cameras, sensor-specific: X-Trans V, IV, III, II, & I. They also have an app (iOS or Android) with recipes ie settings that can be programmed into Fujifilm cameras and saved.


Why use film simulations when shooting digitally? Digital cameras will produce neutrally-toned images based on the camera manufacturer’s color science. People often choose a camera based on this – some people prefer Sony’s color science, others like Canon or Nikon, especially in regards to skin tones. This is especially true for photographers generating jpgs directly from the camera not wanting to wait or post-process.
Some photographers, like myself, prefer to shoot jpg+raw. Raw format offers the most information & potential for post-processing in a digital darkroom – computer software like Lightroom, Adobe Camera Raw, Capture One, or PhotoLab. But camera-generated jpgs are handy to include since they are available to share immediately without post-processing.
My current workflow is to shoot raw and process the photos in Lightroom & Photoshop. This results in (potentially) the truest representation of what I was photographing. Allowing me to maximize the dynamic range, adjust the color, & balance the exposure of the scene. Any experienced Lightroom or Photoshop user can create their own presets and save them. These presets can then be applied at different percentages (<100%) and their intensity or effect adjusted using sliders.
I started photographing using Nikon film cameras a long time ago. So lately, I’ve been curious about making digital photos that emulate analog film from that time. The ability to generate images with analog film color science applied can results in photos that are more of an artistic interpretation. At least in my mind. So lately, my post-processing is to start with analog film presets professionally formulated then adjusting settings after their application.
Buying a Fujifilm camera and using their built-in film types is a very popular practice for photographers interested in analog film simulation. But, if like me, you are invested in another camera system. You can find film simulation presets (many free) that work on raw images or jpgs from any camera. I can shoot normally – raw+jpg – and in the digital darkroom (Lightroom) apply different film simulation presets after I’ve edited the raw image. This allows more flexibility than in-camera film simulation jpgs by allowing you to try different film simulations on a single (edited or unedited) image. You lose the immediacy of in-camera jpgs being uploadable to social media. But you can experiment with different film simulations and find the one most appealing for the subject matter – flesh tones for example.

Here are some results


Wes Anderson Presets (for @accidentallywesanderson)


Other Film Simulations

HEIC to JPG Conversion

The latest Apple iPhone camera format has a more efficient algorithm for storing image information in less space. Unfortunately, unless you work regularly in the Apple environment – MacBook, IPad, IPhone – the format may be unviewable. These are hopefully temporary growing-pain for this new efficient image format as more and more photography programs accept the new format. In the meantime, there are several workarounds to work with or convert HEIC to JPG:

  • HEIC to JPG (for Windows, free)      https://www.copytrans.net/copytransheic/
    I find converting the HEIC to JPG to be one of the easiest solutions and this free utility makes it pretty easy to convert multiple heic to jpg photos.
  • In Windows 10/11, you can convert a HEIC by viewing the photo in Windows Photo, usually accessed by double-clicking the heic file. You may need to install Microsoft Window’s free file extension:

then click the … in the upper right corner and ‘save as’

then select ‘jpg’. This is easy but if you are doing more than one photo, you’ll have to repeat the process for each image.

  • Microsoft Windows Store has a bunch of free and paid apps that will convert HEIC to JPG if you want more features:

Google ‘HEIC to JPG’ and there are plenty of articles that explain many ways to convert HEIC to JPG. I ended up changing my iPhone image format to JPG to eliminate the need to do the conversion since I post many photos online. Once HEIC works with WordPress and browsers, it will become my format of choice. But unitl then, the space savings of the new format are not compelling enough to add the inconvenience of the conversion step.

Googled “HEIC to JPG’ articles: How-To-Geek Article & Tom’s Guide Article